

Gemstone tumbling is the simplest and least expensive lapidary art to learn. These guidelines can help you choose the right equipment and get started.
8 Minute Read
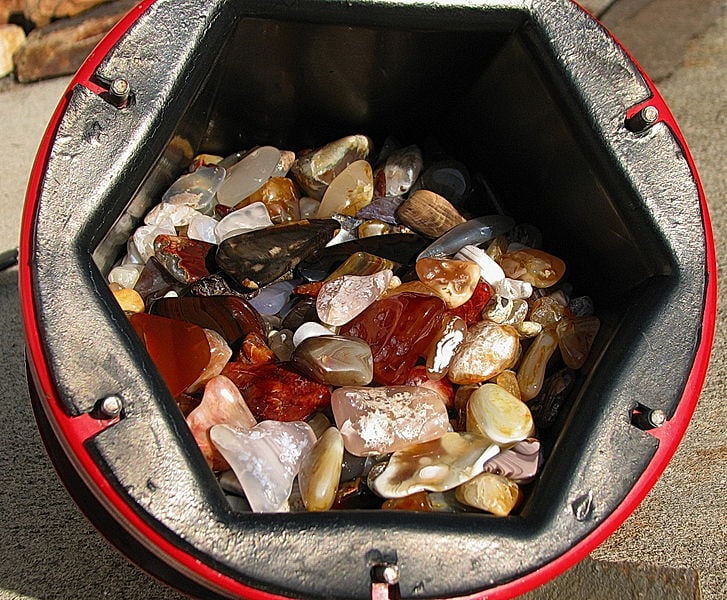
In order for the tumbling action to work, you must place stones of various sizes in the revolving barrel. They need to range from not more than half the diameter of your barrel to about 1/10th the size of the largest stone. You cannot simply put a few large pieces in the tumbling barrel and expect them to come out nice.
Simply gathering stones in an assortment of sizes isn't too challenging. If all the sizes you need aren't readily available, simply use a hammer to create them. However, if you intend to work with stones the size of melons, you'd better be prepared to gather a lot of filler!

Knowing what you want to polish and the size range of the stones you need will help you determine what size tumbler to buy. The largest stone you can finish will be about half the diameter of the barrel. Therefore, your least expensive models with a barrel four inches in diameter can only finish two-inch diameter stones. Moving up to a machine twice that size will cost twice as much and require twice the abrasives and filler. For the serious lapidary, this is a reasonable investment. For the part-time hobbyist, it may not be worthwhile.
Consider how often you plan on using your machine. For example, if you just want to polish a couple of dozen agates you found on vacation, you might not need a machine large enough to do them all at once. With a smaller tumbler, you may have to process your stones in two or more batches. However, if the gem tumbling machine is going to sit idle most of the time, purchasing a larger unit would be a waste of money.
All the gemstones in your barrel need to have the same hardness. Harder stones will scratch softer ones. If you have even one stone in your tumbler that's harder than the rest, it will scratch everything else in the barrel. (Of course, stones used just for filler can be softer that the gems you want to polish, since it doesn't matter if they're scratched).
Measuring the hardness of your rocks may seem daunting but can be accomplished with simple tools. A pocketknife is about 6 to 6.5 in hardness. A file is closer to 7. You can also assemble a set of stones of known hardness value for your testing.
Materials of the same hardness won't scratch each other. Therefore, you can use one stone to test rough of the same kind. For example, if you want to tumble some agate pieces, use one to scratch the others. The piece shouldn't scratch any of them or show any wear itself. If it does wear away on a stone, that piece is harder and shouldn't be included in your tumbler.
Not all stones will take a polish, just the harder ones. A simple field test will save you from bringing home a lot of useless rock. Try scratching them with a pocketknife. If you cannot scratch the specimen, it will take a polish. You will find other potential prizes are nothing more than compressed mud. Not only will they not take a polish, they'll create quite a mess!
Location, location, location. That saying isn't just for real estate. You need to consider carefully where you're going to place your equipment. Gemstone tumbling machines are noisy and run 24 hours for days on end. Lortone makes tumblers with rubber barrels to minimize the noise. While this helps, they're still noisy. You need more than one wall between your bed and the tumbler if you want to get any sleep. If you're using a machine with a steel barrel, you'll need more than that! Don't forget about your neighbors, either. Simply putting the tumbler in the garage may help you sleep but won't ingratiate you with them.
If you don't have a secluded room or basement, consider making a container for it. A cardboard box lined with styrofoam or covered with an old blanket will reduce the sound considerably.
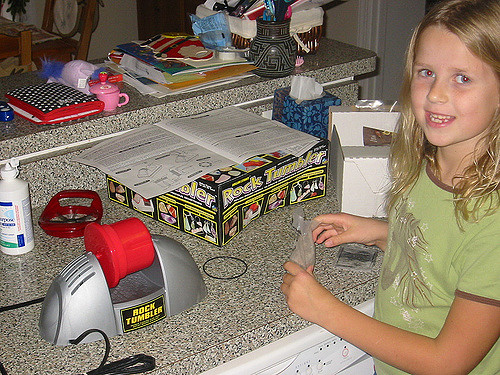
There are two kinds of tumblers: rotary and vibratory. Rotary tumblers are the most well known. You can find them at any rock shop, scientific supply house, toy store, and, of course, online. They're the least expensive variety and come in the widest range of sizes.
Vibratory tumblers shake the ingredients, rather than rolling them over each other. They have the single advantage of being faster. What would take weeks in a rotary tumbler can be done in a couple of days in a vibratory. They also have a significant disadvantage. The barrels don't stand up to coarse tumbling and wear out quickly. Hence, these are usually reserved for finishing gems and aren't recommended for general purpose use.
Budget for an extra barrel for your machine. Reserve it for polishing only. This is especially important if you're using a rubber barrel. They're very difficult to clean completely. If you have any abrasive, even one or two little pieces, left in the barrel when you try to polish, it will scratch your stones. They'll look awful, and you'll have to go back, clean the barrel more thoroughly, and polish them again.
Successful results have more to do with your choice of abrasives than the machine. Most companies that sell gemstone tumbling machines also offer abrasives in a kit. They may even be included with the tumbler. Polishing kits are recommended for beginners. As you gain experience, you can try different polishes and combinations and save money by purchasing in quantity.
The instructions that come with the machine you purchase will be much more specific than this article can be. I recommend following those instructions. However, here is a general outline of how the process works.
This second step is usually done with fine grit silicon carbide. It also takes about a week. As in the first stage, you should inspect your progress daily.
The process is complete when all the coarse scratches are removed and the stones are silky smooth.
The instructions for gemstone tumbling will vary on what comes next. Some will go directly to the polish stage. Others will have a pre-polish first. Just follow the instructions. Regardless of which step you're on, the procedures remain the same. Clean the stones and barrel outside. Replace them. Add water and abrasives, then set the machine to work. Check the progress daily.
If you're using a pre-polish, your work will be complete when the stones have a smooth and satiny surface when dry and look polished when wet. In the polishing stage, you're finished when they sparkle and shine from every direction. If you're ever not sure if your stones are done, give them an extra day or two. More time won't hurt them, but too little will result in a substandard polish.
The whole process will take approximately a month to complete, although the actual work is only a couple of hours. If you go away for a few days, you can simply turn the tumbler off and restart it when you come back.
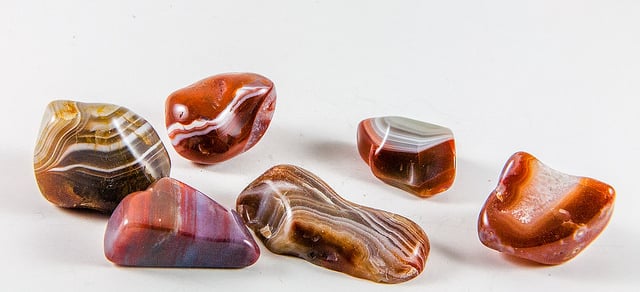
As with any lapidary project, that final day will make it all worthwhile. You've spent considerable effort in all the preliminary stages. While watching the progress is fun, the best reward is when you dry your stones and they glisten with vibrant, beautiful colors. They're now a delight to the eye and a welcome gift for friends and family.


When you join the IGS community, you get trusted diamond & gemstone information when you need it.
In order for the tumbling action to work, you must place stones of various sizes in the revolving barrel. They need to range from not more than half the diameter of your barrel to about 1/10th the size of the largest stone. You cannot simply put a few large pieces in the tumbling barrel and expect them to come out nice.
Simply gathering stones in an assortment of sizes isn't too challenging. If all the sizes you need aren't readily available, simply use a hammer to create them. However, if you intend to work with stones the size of melons, you'd better be prepared to gather a lot of filler!
Knowing what you want to polish and the size range of the stones you need will help you determine what size tumbler to buy. The largest stone you can finish will be about half the diameter of the barrel. Therefore, your least expensive models with a barrel four inches in diameter can only finish two-inch diameter stones. Moving up to a machine twice that size will cost twice as much and require twice the abrasives and filler. For the serious lapidary, this is a reasonable investment. For the part-time hobbyist, it may not be worthwhile.
Consider how often you plan on using your machine. For example, if you just want to polish a couple of dozen agates you found on vacation, you might not need a machine large enough to do them all at once. With a smaller tumbler, you may have to process your stones in two or more batches. However, if the gem tumbling machine is going to sit idle most of the time, purchasing a larger unit would be a waste of money.
All the gemstones in your barrel need to have the same hardness. Harder stones will scratch softer ones. If you have even one stone in your tumbler that's harder than the rest, it will scratch everything else in the barrel. (Of course, stones used just for filler can be softer that the gems you want to polish, since it doesn't matter if they're scratched).
Measuring the hardness of your rocks may seem daunting but can be accomplished with simple tools. A pocketknife is about 6 to 6.5 in hardness. A file is closer to 7. You can also assemble a set of stones of known hardness value for your testing.
Materials of the same hardness won't scratch each other. Therefore, you can use one stone to test rough of the same kind. For example, if you want to tumble some agate pieces, use one to scratch the others. The piece shouldn't scratch any of them or show any wear itself. If it does wear away on a stone, that piece is harder and shouldn't be included in your tumbler.
Not all stones will take a polish, just the harder ones. A simple field test will save you from bringing home a lot of useless rock. Try scratching them with a pocketknife. If you cannot scratch the specimen, it will take a polish. You will find other potential prizes are nothing more than compressed mud. Not only will they not take a polish, they'll create quite a mess!
Location, location, location. That saying isn't just for real estate. You need to consider carefully where you're going to place your equipment. Gemstone tumbling machines are noisy and run 24 hours for days on end. Lortone makes tumblers with rubber barrels to minimize the noise. While this helps, they're still noisy. You need more than one wall between your bed and the tumbler if you want to get any sleep. If you're using a machine with a steel barrel, you'll need more than that! Don't forget about your neighbors, either. Simply putting the tumbler in the garage may help you sleep but won't ingratiate you with them.
If you don't have a secluded room or basement, consider making a container for it. A cardboard box lined with styrofoam or covered with an old blanket will reduce the sound considerably.
There are two kinds of tumblers: rotary and vibratory. Rotary tumblers are the most well known. You can find them at any rock shop, scientific supply house, toy store, and, of course, online. They're the least expensive variety and come in the widest range of sizes.
Vibratory tumblers shake the ingredients, rather than rolling them over each other. They have the single advantage of being faster. What would take weeks in a rotary tumbler can be done in a couple of days in a vibratory. They also have a significant disadvantage. The barrels don't stand up to coarse tumbling and wear out quickly. Hence, these are usually reserved for finishing gems and aren't recommended for general purpose use.
Budget for an extra barrel for your machine. Reserve it for polishing only. This is especially important if you're using a rubber barrel. They're very difficult to clean completely. If you have any abrasive, even one or two little pieces, left in the barrel when you try to polish, it will scratch your stones. They'll look awful, and you'll have to go back, clean the barrel more thoroughly, and polish them again.
Successful results have more to do with your choice of abrasives than the machine. Most companies that sell gemstone tumbling machines also offer abrasives in a kit. They may even be included with the tumbler. Polishing kits are recommended for beginners. As you gain experience, you can try different polishes and combinations and save money by purchasing in quantity.
The instructions that come with the machine you purchase will be much more specific than this article can be. I recommend following those instructions. However, here is a general outline of how the process works.
This second step is usually done with fine grit silicon carbide. It also takes about a week. As in the first stage, you should inspect your progress daily.
The process is complete when all the coarse scratches are removed and the stones are silky smooth.
The instructions for gemstone tumbling will vary on what comes next. Some will go directly to the polish stage. Others will have a pre-polish first. Just follow the instructions. Regardless of which step you're on, the procedures remain the same. Clean the stones and barrel outside. Replace them. Add water and abrasives, then set the machine to work. Check the progress daily.
If you're using a pre-polish, your work will be complete when the stones have a smooth and satiny surface when dry and look polished when wet. In the polishing stage, you're finished when they sparkle and shine from every direction. If you're ever not sure if your stones are done, give them an extra day or two. More time won't hurt them, but too little will result in a substandard polish.
The whole process will take approximately a month to complete, although the actual work is only a couple of hours. If you go away for a few days, you can simply turn the tumbler off and restart it when you come back.
As with any lapidary project, that final day will make it all worthwhile. You've spent considerable effort in all the preliminary stages. While watching the progress is fun, the best reward is when you dry your stones and they glisten with vibrant, beautiful colors. They're now a delight to the eye and a welcome gift for friends and family.


