

Whether you're creating a simple gem accent or an exquisite cameo, the tools and techniques of cabochon carving are the same. Get started with this guide.
8 Minute Read
Some people shy away from carving because they think it's too difficult or time consuming. OK, maybe you don't have the talent to carve the likeness of a person. However, that shouldn't prevent you from adding simple curves and accents to some of your gemstone creations. In truth, cabochon carving doesn't take a lot of time. I completed most of the following carvings in less than an hour. When you consider the overall increase in value carving can bring to a gem, it becomes more than worthwhile. Cabochon carving can also help you turn leftover rough and junk stones, including included pieces, into fine gems that can be as valuable as clean, faceted stones.
You'll only a few simple tools and accessories. Any flex shaft will do. You can also use a standard Dremel-type tool, though they're not as easy to maneuver as a flex shaft. Many carvers use a fixed arbor, a motor mounted horizontally with a chuck on the end. A drill press serves the same purpose. Many can be adjusted for horizontal use, as well. You'll need a few carving bits or tips. Carving bits can be made of metal, ceramic, wood, or plastic. Anything that will hold a charge will work.
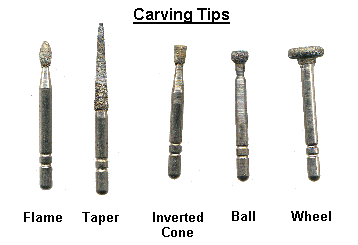
Nowadays, the most common bits are diamond impregnated steel. Get an assortment of shapes and, if at all possible, different grits. 1,200 or finer is very helpful if you intend to polish the carved areas. Traditionally, carvers typically used wooden carving tools. These still rank among the best accessories. You can also make wooden tools yourself in any shape needed. (See our article on optical dish carving for more information).
The secret to polishing is a good pre-polishing. If you have a set of bits in assorted fine grits, then it's fairly simple. Keep working with progressively finer grades until you have an adequate polish or pre-polish. (If you make your accessories, create several in the same size and shape. Charge them with different grits to use for cutting, pre-polishing, and polishing). You can't always get matched sets but you can still polish your carvings.
Cratex wheels are useful pre-polishing tools. They consist of silicon carbide in a rubber-type matrix. You can purchase them in a number of shapes and grit sizes.
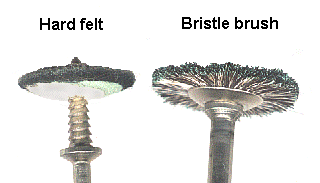
Hard felt brushes come in a variety of shapes. They work well with diamond but cut very slow. Don't be afraid to use a coarser grit on felt. If 600 doesn't take out your fine tool marks, try 325. Felt has so much give that it will cut slower and with finer scratches than you would expect from the grit size. Bristle brushes are relatively new and also cut very slowly. For best use, reserve these for polishing.
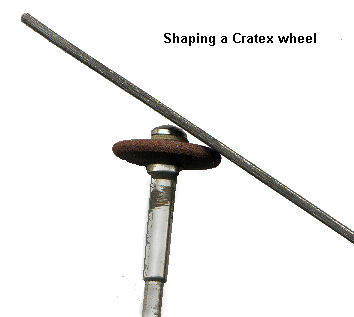
You can shape Cratex and felt wheels to fit almost any particular need. Simply hold it to a file while it's running.
Polishing is done with a number of tools. If you have a set of tools that you charge yourself, then use the same size and shape as you did in the pre-polish. Otherwise, felt or brushes will work.
Oxide polishes work well on several stones. Generally, diamond, with its hardness, will prove the most effective. You'll usually mix oxide polishes with water to make a paste. If you can stand the smell, mixing them with vinegar improves their efficiency. Diamond bort is traditionally mixed with vegetable oil. The diamond pastes available for charging laps also work well. You can use them on wood, felt, or brushes.
You can also purchase wax-based pastes designed specifically for carving. They work much cooler than lapidary compounds. (Heat is a problem when pre-polishing and polishing, and you have to be very careful not to shock your stone). They also clean up easily when you need to check your progress. These polishes are available from Alpha Supply in Bremerton, Washington.
You need to keep your stone and tools cool. Some people use a drip system with a bowl underneath to catch the excess. A simpler method is just a small bowl of water. Simply dip the stone every few seconds. You'll find that as the carved areas get deeper, the water stays in them longer. Rinsing the stone off in the bowl also removes swarf so you can better see your progress.
There are just three basic cabochon carving styles.
Keep in mind that you don't always need to carve the entire surface of a gem. Just a few accent lines are often enough to make a mediocre stone something special. You can use accents like lines and highlights to draw attention to or away from an area.
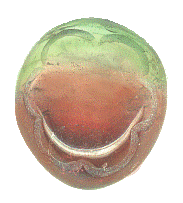
For example, this tourmaline has beautiful colors but is heavily included around the edges. I wanted to direct attention to the center of the stone and accomplished that with a few simple lines.
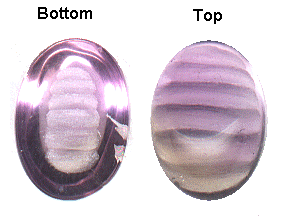
With opaque or translucent stones, accents always go on the top surface. With transparent gems, in general, if the stone is clean, put your design on the bottom. This moves the viewer's attention into the stone. If the stone is included, put the design on the top to draw attention away from the inclusions.
Some projects deserve more complex and time-consuming designs. However, you can accomplish a great deal with a few simple accents. Start with simple designs. Long, graceful curves are easier to cut than small, tight ones and slightly easier than straight lines. An asymmetrical design also relieves you from making each side match.
You can cut lines with wheels, inverted cones, or flame-shaped tools. Balls are the hardest to use for lines. Small, tight curves are the most difficult thing to carve. When you do attempt a tight turn, use an inverted cone tip. As your skills develop, you can move to more elaborate designs. The tools and the techniques remain the same. Only the amount carved changes.
Almost all the carving you'll be doing is intaglio. You'll be cutting a design into the surface of a stone. If you want to cut a cameo, you're doing a mirror of an intaglio. That is, you're cutting material away from the design, rather than cutting the design itself. While the approach is different, the techniques for removing material are the same.
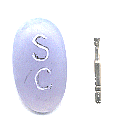
Here's an example of a simple intaglio carving. I had a piece of holly-blue agate. The color was a nice, pure blue. A goldsmith could make a beautiful piece of jewelry using this as a splash of color, but as a stand-alone gem it was pretty boring. To add interest, I carved my wife's initials on it.
The procedure is simple. Since I started with a finished cab, I took the surface back to a 600 finish. (If you were starting from scratch, simply stop at the pre-polish stage). This serves two purposes. First, it gives you a rough surface you can draw on. Also, your tools are likely to leave scratches on the surface. They would be disastrous on a polished surface but are easily removed at this stage.
Begin by sketching your design in pencil on the stone. It may take a few attempts to get the design right, and the pencil allows for easy changes. Once satisfied with your design, go over it with a fine-tipped pen or an aluminum pencil. You want something you can easily see as you work on it.
The carving is done in stages. To begin, lightly scratch the outline using the appropriate tool. In this case, I used an inverted cone. As you can see from the first picture, the "S" is larger than the "C," which isn't properly centered either. This is common and correctable.
The next step is to enlarge the carving. To make the necessary adjustments, I enlarged the "C" from the outside and the "S" on the inside. This brought the letters back into proportion.
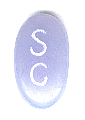
At this stage, the inside of the letters were rough and bumpy. So the next step was to widen the letters a bit more and to smooth out the channel. This was done with a small ball bit. In this picture, the letters are still uneven. What's difficult to see from the picture is that the wide parts are mostly surface scratches. I removed them by taking the stone to the 600 wheel and smoothing the surface.
As you take out the surface scratches, you may find you need to go back to the carving tool to enlarge an area. Going back and forth between your cabbing machine and carving tools is common. Observe the basic rule of "cut a little, look a lot" to avoid big mistakes. "Cut a little" means you go back and forth making fine adjustments.
When you have the engraving where you want it, clean the grooves of all swarf so it's not pulled across the surface during polishing. Then pre-polish and polish as usual.

Note that no polishing was done to the carved area. It's the rough surface that makes the engraving stand out. On other occasions, polishing the grooves would be appropriate. However, you'll often find that a frosted surface best suits your intended design.
If you choose to leave an area frosted, sand it down to a 600 or 1,200 finish. There are two reasons for this. You don't want coarse chunks picked up and drawn across your polishing lap or wheel. Coarse areas will also hold dirt and be hard to clean.


When you join the IGS community, you get trusted diamond & gemstone information when you need it.
Some people shy away from carving because they think it's too difficult or time consuming. OK, maybe you don't have the talent to carve the likeness of a person. However, that shouldn't prevent you from adding simple curves and accents to some of your gemstone creations. In truth, cabochon carving doesn't take a lot of time. I completed most of the following carvings in less than an hour. When you consider the overall increase in value carving can bring to a gem, it becomes more than worthwhile. Cabochon carving can also help you turn leftover rough and junk stones, including , into fine gems that can be as valuable as clean, faceted stones.
You'll only a few simple tools and accessories. Any flex shaft will do. You can also use a standard Dremel-type tool, though they're not as easy to maneuver as a flex shaft. Many carvers use a fixed arbor, a motor mounted horizontally with a chuck on the end. A drill press serves the same purpose. Many can be adjusted for horizontal use, as well. You'll need a few carving bits or tips. Carving bits can be made of metal, ceramic, wood, or plastic. Anything that will hold a charge will work.
Nowadays, the most common bits are diamond impregnated steel. Get an assortment of shapes and, if at all possible, different grits. 1,200 or finer is very helpful if you intend to polish the carved areas. Traditionally, carvers typically used wooden carving tools. These still rank among the best accessories. You can also make wooden tools yourself in any shape needed. (See our article on optical dish carving for more information).
The secret to polishing is a good pre-polishing. If you have a set of bits in assorted fine grits, then it's fairly simple. Keep working with progressively finer grades until you have an adequate polish or pre-polish. (If you make your accessories, create several in the same size and shape. Charge them with different grits to use for cutting, pre-polishing, and polishing). You can't always get matched sets but you can still polish your carvings.
Cratex wheels are useful pre-polishing tools. They consist of silicon carbide in a rubber-type matrix. You can purchase them in a number of shapes and grit sizes.
Hard felt brushes come in a variety of shapes. They work well with diamond but cut very slow. Don't be afraid to use a coarser grit on felt. If 600 doesn't take out your fine tool marks, try 325. Felt has so much give that it will cut slower and with finer scratches than you would expect from the grit size. Bristle brushes are relatively new and also cut very slowly. For best use, reserve these for polishing.
You can shape Cratex and felt wheels to fit almost any particular need. Simply hold it to a file while it's running.
Polishing is done with a number of tools. If you have a set of tools that you charge yourself, then use the same size and shape as you did in the pre-polish. Otherwise, felt or brushes will work.
Oxide polishes work well on several stones. Generally, diamond, with its hardness, will prove the most effective. You'll usually mix oxide polishes with water to make a paste. If you can stand the smell, mixing them with vinegar improves their efficiency. Diamond bort is traditionally mixed with vegetable oil. The diamond pastes available for charging laps also work well. You can use them on wood, felt, or brushes.
You can also purchase wax-based pastes designed specifically for carving. They work much cooler than lapidary compounds. (Heat is a problem when pre-polishing and polishing, and you have to be very careful not to shock your stone). They also clean up easily when you need to check your progress. These polishes are available from Alpha Supply in Bremerton, Washington.
You need to keep your stone and tools cool. Some people use a drip system with a bowl underneath to catch the excess. A simpler method is just a small bowl of water. Simply dip the stone every few seconds. You'll find that as the carved areas get deeper, the water stays in them longer. Rinsing the stone off in the bowl also removes swarf so you can better see your progress.
There are just three basic cabochon carving styles.
Keep in mind that you don't always need to carve the entire surface of a gem. Just a few accent lines are often enough to make a mediocre stone something special. You can use accents like lines and highlights to draw attention to or away from an area.
For example, this tourmaline has beautiful colors but is heavily included around the edges. I wanted to direct attention to the center of the stone and accomplished that with a few simple lines.
With opaque or translucent stones, accents always go on the top surface. With transparent gems, in general, if the stone is clean, put your design on the bottom. This moves the viewer's attention into the stone. If the stone is included, put the design on the top to draw attention away from the inclusions.
Some projects deserve more complex and time-consuming designs. However, you can accomplish a great deal with a few simple accents. Start with simple designs. Long, graceful curves are easier to cut than small, tight ones and slightly easier than straight lines. An asymmetrical design also relieves you from making each side match.
You can cut lines with wheels, inverted cones, or flame-shaped tools. Balls are the hardest to use for lines. Small, tight curves are the most difficult thing to carve. When you do attempt a tight turn, use an inverted cone tip. As your skills develop, you can move to more elaborate designs. The tools and the techniques remain the same. Only the amount carved changes.
Almost all the carving you'll be doing is intaglio. You'll be cutting a design into the surface of a stone. If you want to cut a cameo, you're doing a mirror of an intaglio. That is, you're cutting material away from the design, rather than cutting the design itself. While the approach is different, the techniques for removing material are the same.
Here's an example of a simple intaglio carving. I had a piece of holly-blue agate. The color was a nice, pure blue. A goldsmith could make a beautiful piece of jewelry using this as a splash of color, but as a stand-alone gem it was pretty boring. To add interest, I carved my wife's initials on it.
The procedure is simple. Since I started with a finished cab, I took the surface back to a 600 finish. (If you were starting from scratch, simply stop at the pre-polish stage). This serves two purposes. First, it gives you a rough surface you can draw on. Also, your tools are likely to leave scratches on the surface. They would be disastrous on a polished surface but are easily removed at this stage.
Begin by sketching your design in pencil on the stone. It may take a few attempts to get the design right, and the pencil allows for easy changes. Once satisfied with your design, go over it with a fine-tipped pen or an aluminum pencil. You want something you can easily see as you work on it.
The carving is done in stages. To begin, lightly scratch the outline using the appropriate tool. In this case, I used an inverted cone. As you can see from the first picture, the "S" is larger than the "C," which isn't properly centered either. This is common and correctable.
The next step is to enlarge the carving. To make the necessary adjustments, I enlarged the "C" from the outside and the "S" on the inside. This brought the letters back into proportion.
At this stage, the inside of the letters were rough and bumpy. So the next step was to widen the letters a bit more and to smooth out the channel. This was done with a small ball bit. In this picture, the letters are still uneven. What's difficult to see from the picture is that the wide parts are mostly surface scratches. I removed them by taking the stone to the 600 wheel and smoothing the surface.
As you take out the surface scratches, you may find you need to go back to the carving tool to enlarge an area. Going back and forth between your cabbing machine and carving tools is common. Observe the basic rule of "cut a little, look a lot" to avoid big mistakes. "Cut a little" means you go back and forth making fine adjustments.
When you have the engraving where you want it, clean the grooves of all swarf so it's not pulled across the surface during polishing. Then pre-polish and polish as usual.
Note that no polishing was done to the carved area. It's the rough surface that makes the engraving stand out. On other occasions, polishing the grooves would be appropriate. However, you'll often find that a frosted surface best suits your intended design.
If you choose to leave an area frosted, sand it down to a 600 or 1,200 finish. There are two reasons for this. You don't want coarse chunks picked up and drawn across your polishing lap or wheel. Coarse areas will also hold dirt and be hard to clean.


