

The glass used to make refractometer hemicylinders is susceptible to tarnish. Here's a step-by-step guide for re-polishing a refractometer hemicylinder.
1 Minute Read
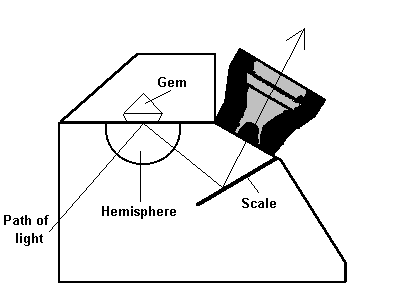
Answer: The refractometer hemicylinder or hemisphere can oxidize over time and interfere with refractive index readings. Fortunately, removing the tarnish isn't difficult.
I had a similar problem after buying a used GIA Duplex II refractometer for my business. The problem you're experiencing is common, because the high lead content of the glass makes the refractometer hemicylinder surface susceptible to tarnish.
To remedy this, you'll need to re-polish the hemicylinder. This is easier than it sounds. You'll need some common supplies for lapidaries and about 15 minutes.
Obviously, it's been a while since your refractometer was last polished, so you might have to re-polish the surface of your hemicylinder three or four times before you remove all the tarnish and get a crystal-clear reading. Basically, you're polishing the glass much like you would a gemstone, so be patient and thorough.
I recommend re-polishing the refractometer hemicylinder every six months to keep your readings accurate. Gemologists do this on a regular basis to get a sharp, clear dilation line for accurate measurements.
Douglas LeGrand, GG
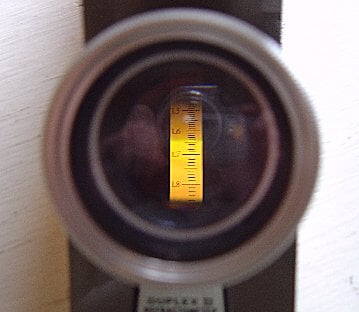
One indication of possible oxidation on the table of your refractometer cylinder is if you can see any rainbow banding on its surface. This isn't a guarantee that it's oxidized, however. (Editor's note: rainbow colors may also indicate the presence of extraneous light).
Roy Auerbach


When you join the IGS community, you get trusted diamond & gemstone information when you need it.
Answer: The refractometer hemicylinder or hemisphere can oxidize over time and interfere with refractive index readings. Fortunately, removing the tarnish isn't difficult.
I had a similar problem after buying a used GIA Duplex II refractometer for my business. The problem you're experiencing is common, because the makes the refractometer hemicylinder surface susceptible to tarnish.
To remedy this, you'll need to re-polish the hemicylinder. This is easier than it sounds. You'll need some common supplies for lapidaries and about 15 minutes.
Obviously, it's been a while since your refractometer was last polished, so you might have to re-polish the surface of your hemicylinder three or four times before you remove all the tarnish and get a crystal-clear reading. Basically, you're polishing the glass much like you would a gemstone, so be patient and thorough.
I recommend re-polishing the refractometer hemicylinder every six months to keep your readings accurate. Gemologists do this on a regular basis to get a sharp, clear dilation line for accurate measurements.
Douglas LeGrand, GG
One indication of possible oxidation on the table of your refractometer cylinder is if you can see any rainbow banding on its surface. This isn't a guarantee that it's oxidized, however. (Editor's note: rainbow colors may also indicate the presence of extraneous light).
Roy Auerbach


