

Add sparkle to an emerald cut with a new cutting technique. You can apply this design to gemstones with standard proportions as well as long crystals.
3 Minute Read
The first design based on this technique was for gems of standard proportion. I was very pleased with it. However, I still faced the challenge of what to do with some very long crystals of tourmaline and aquamarine I had in stock. The normal approach would be to cut them as long baguettes or saw them in half to create two smaller, but better proportioned, gems. Neither of these solutions satisfied me. I kept at it until I found a way to apply my sparkling emerald cut technique to very long crystals.
These cuts make use of vertical facets and a curved keel. The finished gems usually have one very bright spot, which may be accompanied by a less bright spot on either side. At first, I was disappointed with this effect. My opinion changed, however, after I carried one of the gems around and saw it in different lighting situations.
With this technique, the majority of the light entering the gem is focused into a single brilliant spot of light. This results in brilliance in soft light situations where most cuts would simply turn dark. That single point of light is also incredibly animated. It races from one end of the gem to the other with astonishing speed. The sparkling emerald cut technique doesn't yield finished gems as dazzling as more symmetrical gems. However, this technique is a significant improvement over a standard emerald cut. It's very practical for wear, especially for softly lit evenings. And as an added bonus, the facet size is reduced for easier polishing.
This design is shown with a 96 index gear and can be used on any proportioned gem. It's quite easy once you have cut one or two stones. The mains adjust very easily during pre-polish, so you have room for error in the first cutting.
This cut is great for those long tourmaline and aquamarine stones. It's brought many ooh's and aah's from jewelers who've seen the results. With 46 facets on the pavilion, the sparkle and brilliance are outstanding.
Follow the steps in the table below.
| Step | Angle | Index |
| Girdle | 90º | 030-090 length |
| Girdle | 90º | 120-060 width |
| Girdle | 90º | 002-058-062-118 |
| Girdle | 90º | 004-056-064-116 |
| 5 | 48º | 120-060 |
| 6 | 48º | 002-058-062-118 |
| 7 | 48º | 004-056-064-116 |
| 8 | 70º | 030-090 ends |
| 9 | 46º | 001-059-061-119 |
| 10 | 46º | 003-057-063-117 |
| 11 | 44º | 001-059-061-119 |
| 12 | 44º | 003-057-063-117 |
| 13 | 43º | 120-060 |
| 14 | 43º | 002-058-062-118 |
| 15 | 43º | 004-056-064-116 |
| 16 | 45º | 120-060 |
| 17 | 45º | 002-058-062-118 |
| 18 | 45º | 004-056-064-116 |
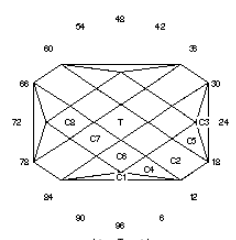
Steps one through four: create a level girdle. As you cut one through three, aim to get all three facets the same width, as viewed from the side.
Steps five and six: split the girdle facets and get cut to the girdle. Where those facets meet is where you cut to for steps seven through eleven.
In the diagram, those meetpoints have been cut over by facets twelve and thirteen. However, it will be obvious when it''s on the dop.
For the last three steps, simply trim off corners. (These steps are only used on very large gems).
To finish the crown, step cut it with the same indices used for the girdle.
Happy Faceting!


When you join the IGS community, you get trusted diamond & gemstone information when you need it.
The first design based on this technique was for gems of standard proportion. I was very pleased with it. However, I still faced the challenge of what to do with some very long crystals of tourmaline and I had in stock. The normal approach would be to cut them as long baguettes or saw them in half to create two smaller, but better proportioned, gems. Neither of these solutions satisfied me. I kept at it until I found a way to apply my sparkling emerald cut technique to very long crystals.
These cuts make use of vertical facets and a curved keel. The finished gems usually have one very bright spot, which may be accompanied by a less bright spot on either side. At first, I was disappointed with this effect. My opinion changed, however, after I carried one of the gems around and saw it in different lighting situations.
With this technique, the majority of the light entering the gem is focused into a single brilliant spot of light. This results in brilliance in soft light situations where most cuts would simply turn dark. That single point of light is also incredibly animated. It races from one end of the gem to the other with astonishing speed. The sparkling emerald cut technique doesn't yield finished gems as dazzling as more symmetrical gems. However, this technique is a significant improvement over a standard emerald cut. It's very practical for wear, especially for softly lit evenings. And as an added bonus, the facet size is reduced for easier polishing.
This design is shown with a 96 index gear and can be used on any proportioned gem. It's quite easy once you have cut one or two stones. The mains adjust very easily during pre-polish, so you have room for error in the first cutting.
This cut is great for those long tourmaline and aquamarine stones. It's brought many ooh's and aah's from jewelers who've seen the results. With 46 facets on the pavilion, the sparkle and brilliance are outstanding.
Follow the steps in the table below.
| Step | Angle | Index |
| Girdle | 90º | 030-090 length |
| Girdle | 90º | 120-060 width |
| Girdle | 90º | 002-058-062-118 |
| Girdle | 90º | 004-056-064-116 |
| 5 | 48º | 120-060 |
| 6 | 48º | 002-058-062-118 |
| 7 | 48º | 004-056-064-116 |
| 8 | 70º | 030-090 ends |
| 9 | 46º | 001-059-061-119 |
Steps one through four: create a level girdle. As you cut one through three, aim to get all three facets the same width, as viewed from the side.
Steps five and six: split the girdle facets and get cut to the girdle. Where those facets meet is where you cut to for steps seven through eleven.
In the diagram, those meetpoints have been cut over by facets twelve and thirteen. However, it will be obvious when it''s on the dop.
For the last three steps, simply trim off corners. (These steps are only used on very large gems).
To finish the crown, step cut it with the same indices used for the girdle.
Happy Faceting!
| 46º |
| 003-057-063-117 |
| 11 | 44º | 001-059-061-119 |
| 12 | 44º | 003-057-063-117 |
| 13 | 43º | 120-060 |
| 14 | 43º | 002-058-062-118 |
| 15 | 43º | 004-056-064-116 |
| 16 | 45º | 120-060 |
| 17 | 45º | 002-058-062-118 |
| 18 | 45º | 004-056-064-116 |


