

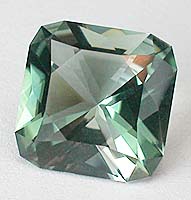
Jeff R Graham shares his opinions, thoughts and suggestions on various topics in Just Ask Jeff. See what he has to share on Just Ask Jeff:Jubilee Project...
2 Minute Read
Michael Hing asked me for permission to use my "Classic 1" design for his Jubilee Project for the queen of England. After we talked a bit he told me that there would be quite a few newbie cutters participating in the project and he thought they might need a more detailed set of cutting instructions. I gave it some thought and decided that the easiest way for people who need some help cutting the design/project would be to post the help on the web so that everyone would be able to get fast easy access. So here you go.
Cutting my "Classic 1" Design
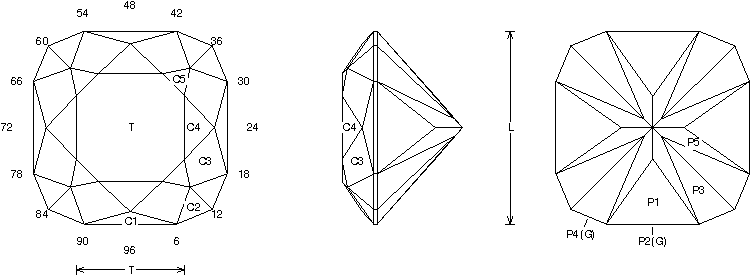
This design is set up for refractive inex 1.62 which is Tourmaline or Topaz. I prefer Tourmaline, it can be cut with no changes in Peridot, Apatite, Spinel, Garnet, Sapphire, Zircon. Pick a nice correctly shaped piece of rough and dop it up.
For more information here is a link to Michael Hing's website www.maiko.demon.co.uk/jubilee
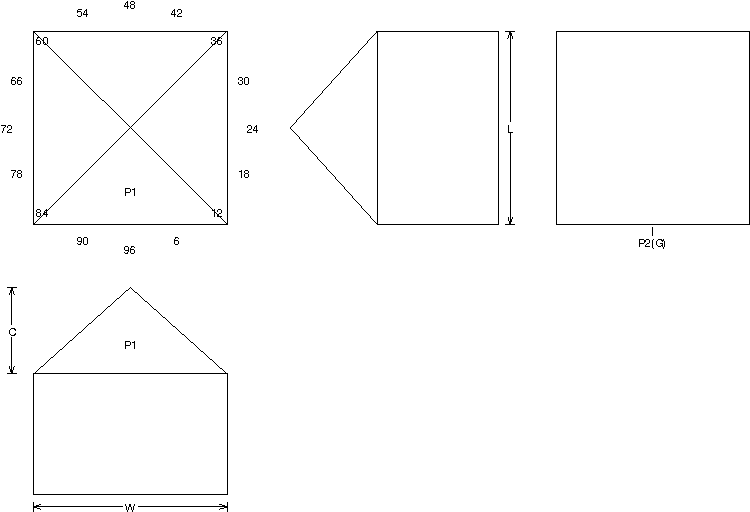
Step #1 (above) First step in cutting this design is to cut P1 to center point. Notice that in the drawing the girdle P2(G) is also cut… It is a good idea to cut the stone to a square if you are a beginner. There are several reasons for cutting to an exact square for a newbie faceter. The main one is that by cutting to a square, the stone will be easier to get straight (make the girdle meets and cheat if needed). The other reason is that if you are not experienced it is difficult to guess how much room to leave at the corners for the P4(G).
Note: If you are experienced the girdle can be left to just the width that you think you need for the girdle corners P4(G) to be cut in. Doing this will save a little rough.
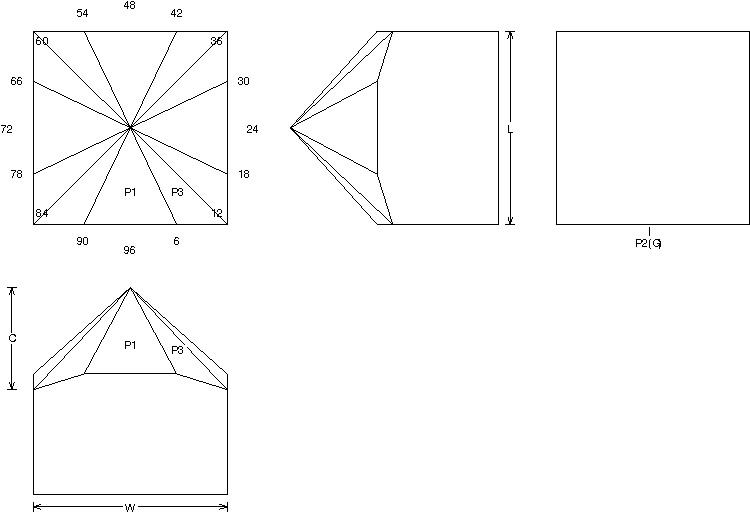
Step #2 (above) Cut the P3 to center point to meet P1. Notice that you will cut throught the girdle at the corrners. This is normal… P3 needs to be cut as evenly as you can because P3 facets actually set the size of the corner girdle facets P4(G).
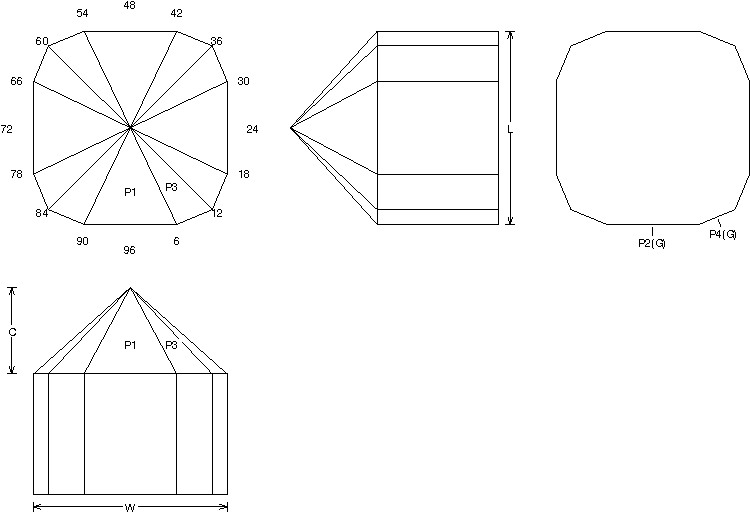
Step #3 (above) Cut the P4(G) girdle facets to meet the P3 facets. It is improtant that you make everything as even and level as you can.
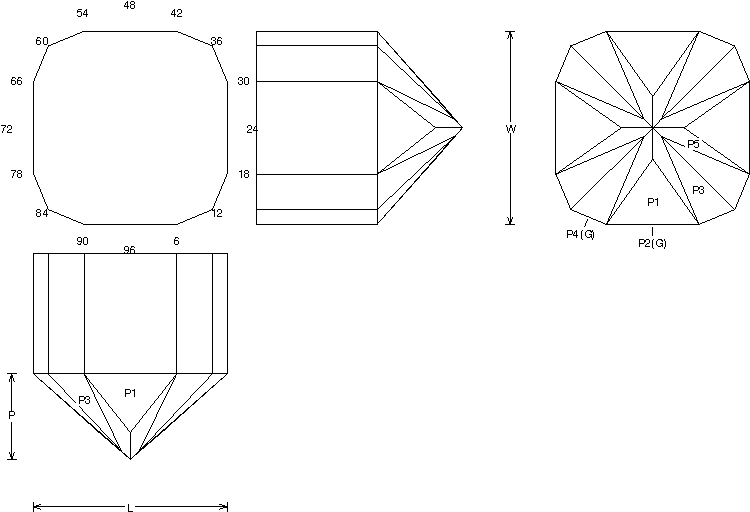
Step #4 (above) Cut the P5 tier. Be careful because these will cut fast especially on a smaller stone.
Transafer the stone after polishing.

Step #5 (above) Cut the C1 tier to meet the girdle. Tip: You can cut the C1 and the C2 tiers both at the same tine and cut around the stone (both tiers are the same angle on this design). If one of the tiers was a higher angle cut both tiers at the high angle. Then once you have a level girdle (cheat is set if needed) cut the lower angle tier to the correct angle.
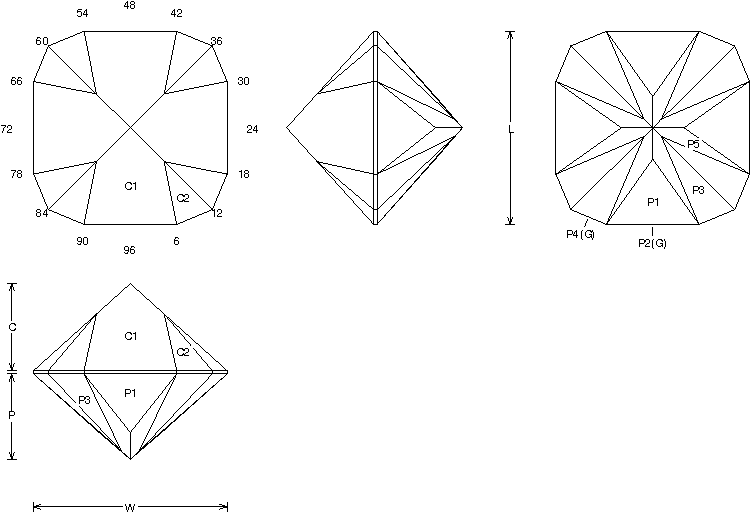
Step #6 (above) Cut the C2 tier in. See tip above.
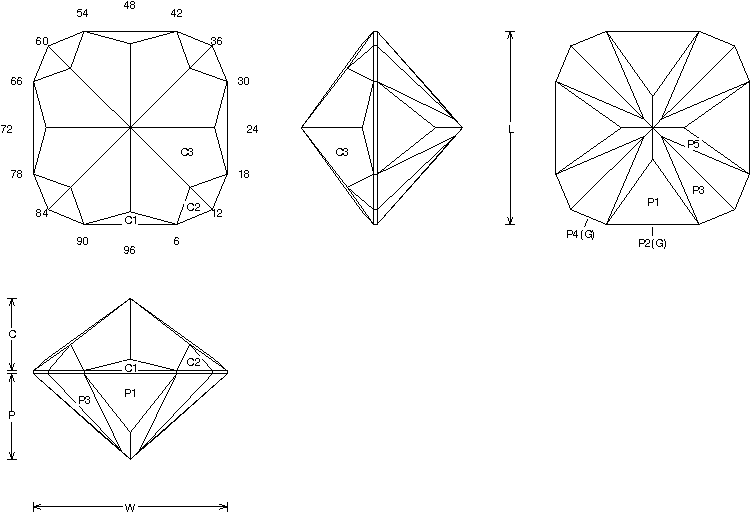
Step #7 (above) Cut the C3 tier to meet girdle.
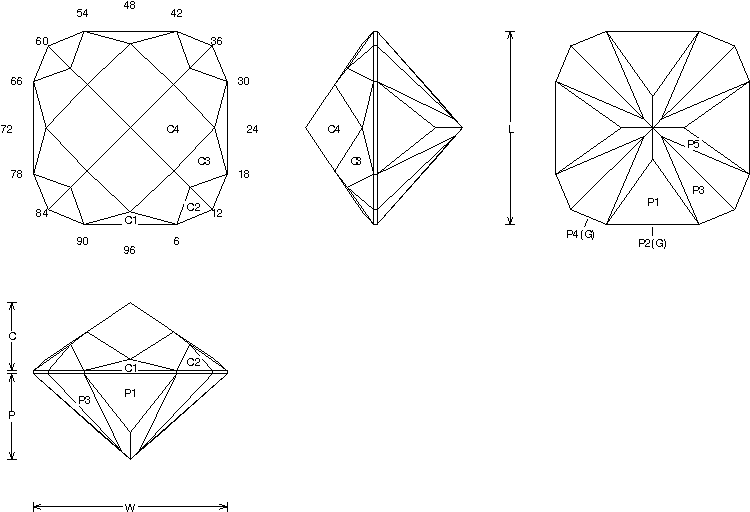
Step #8 (above) Cut the C4 tier to meet C1.
Step #9 (above) Cut C5 to meet C2.
Step #10 (above) Cut the table to meet C3, C4, C5.


When you join the IGS community, you get trusted diamond & gemstone information when you need it.
Michael Hing asked me for permission to use my "Classic 1" design for his Jubilee Project for the queen of England. After we talked a bit he told me that there would be quite a few newbie cutters participating in the project and he thought they might need a more detailed set of cutting instructions. I gave it some thought and decided that the easiest way for people who need some help cutting the design/project would be to post the help on the web so that everyone would be able to get fast easy access. So here you go.
Cutting my "Classic 1" Design
This design is set up for refractive inex 1.62 which is Tourmaline or Topaz. I prefer Tourmaline, it can be cut with no changes in Peridot, , , , , . Pick a nice correctly shaped piece of rough and dop it up.
For more information here is a link to Michael Hing's website www.maiko.demon.co.uk/jubilee
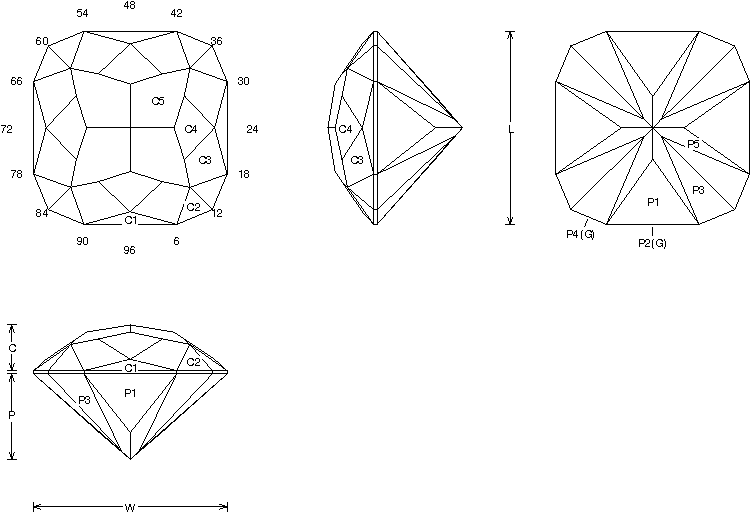
Step #1 (above) First step in cutting this design is to cut P1 to center point. Notice that in the drawing the girdle P2(G) is also cut… It is a good idea to cut the stone to a square if you are a beginner. There are several reasons for cutting to an exact square for a newbie faceter. The main one is that by cutting to a square, the stone will be easier to get straight (make the girdle meets and cheat if needed). The other reason is that if you are not experienced it is difficult to guess how much room to leave at the corners for the P4(G).
Note: If you are experienced the girdle can be left to just the width that you think you need for the girdle corners P4(G) to be cut in. Doing this will save a little rough.
Step #2 (above) Cut the P3 to center point to meet P1. Notice that you will cut throught the girdle at the corrners. This is normal… P3 needs to be cut as evenly as you can because P3 facets actually set the size of the corner girdle facets P4(G).
Step #3 (above) Cut the P4(G) girdle facets to meet the P3 facets. It is improtant that you make everything as even and level as you can.
Step #4 (above) Cut the P5 tier. Be careful because these will cut fast especially on a smaller stone.
Transafer the stone after polishing.
Step #5 (above) Cut the C1 tier to meet the girdle. Tip: You can cut the C1 and the C2 tiers both at the same tine and cut around the stone (both tiers are the same angle on this design). If one of the tiers was a higher angle cut both tiers at the high angle. Then once you have a level girdle (cheat is set if needed) cut the lower angle tier to the correct angle.
Step #6 (above) Cut the C2 tier in. See tip above.
Step #7 (above) Cut the C3 tier to meet girdle.
Step #8 (above) Cut the C4 tier to meet C1.
Step #9 (above) Cut C5 to meet C2.
Step #10 (above) Cut the table to meet C3, C4, C5.


