

Leftover gemstone rough is a great material for learning to cut cabochons. Learn advanced cabbing techniques and find new inspiration for jewelry designs.
8 Minute Read
There are many kinds of lapidaries. Some gem cutters are content keeping their family in birthday and holiday presents. Some find fulfillment putting the most intricate cuts on cubic zirconia. Still others only cut stones they've personally found. Some of us consider ourselves serious gem cutters. Our goal is to facet the most beautiful gems possible and make the best use of the material nature provides us. However, we often fall short. Over the years, most of us have assembled a large collection of leftover rough. This consists of our not-so-exciting material. We haven't found the inspiration to cut these pieces, but they're still too good to throw away.
Practicing cutting cabochons, particularly with advanced techniques, is a great way to use those seconds that have been lying around too long.
The secret to advanced gemstone cutting is using your imagination. You may have cut hundreds or even thousands of ovals. For a change, try a fancy shape or maybe something functional like a cord pull, drawer handles, a recipe card holder, or some ear jackets.
When choosing a cut for a piece of rough, don't just look at its shape. Imagine how it will be used. Knowing if a piece is going to be used for a ring or bolo helps your cutting decisions. For example, sharp ridges on a ring stone would be vulnerable to impact and a poor choice. You can either avoid using that rough or find another use for the stone. This investigative process can lead to new ideas. You may come up with a broach or pendant design for your ridged stone you may not have thought of otherwise.
Some stones may look useless by themselves. Think about how they can be combined with other gems to make something useful. For example, long tourmaline crystals may be too thin to facet. However, they make excellent baguettes to accent other gems. This pink tourmaline started off measuring 12.3 x 3.3 x 2.1 mm deep. It was far too thin to facet, but look how nice it goes with blue apatite. I had this piece for years because it just didn't inspire me. Once I matched it with other stones, it only took five minutes to cut it and create a stunning piece of custom jewelry. Combining gems is one of the best imagination exercises you can do. Comparing shapes, colors, sizes, and textures will help you find combinations you would otherwise have missed. This applies to both gem cutting and jewelry design.
If you have a lot of small gems and little inspiration, try turning them into cabochons. A quick and simple dome can turn a wasted piece of rough into a useful gem. If matched in size and color, a bunch of cabbed domes can be used in a cluster. You can turn your junk into something valuable in five to ten minutes.
(Our article, "Fundamentals of Lapidary Part 4," has information on how to cut cabochons on a faceting machine).
One of the easiest ways to make your cabs special is to give them unique shapes. People often ask me how to do a freeform cut. In most cases, the answer is simple. Just follow the outline of your material and cut it for maximum yield. I recently cut the prettiest oval I could find from a piece of ribbon agate. These are the pieces I had left after sawing.
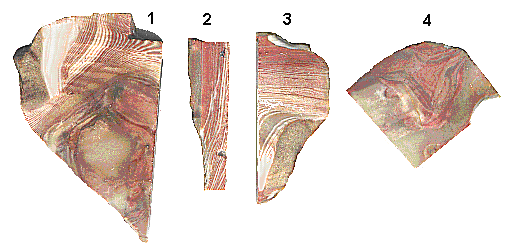
Here are the same pieces, freeform cut primarily by following the shape.
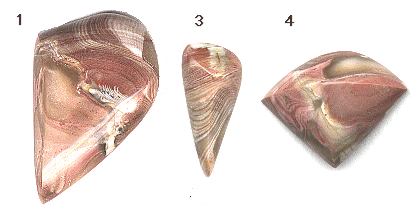
I was very pleased with how the pattern developed while cutting stone #1. It's large and will make a stunning bolo. Stone #3 has a simple pattern. I used a combination of asymmetrical curves and ridges to add interest to it. It'll make a nice pendant. Stone #4 has a whimsical, sci-fi look to it. This will make a custom pendant, bracelet, or belt buckle. Unfortunately, stone #2 was unusable. Still, I turned three out of four leftovers into nice gems. They may not be high art but they're much nicer than if they were still sitting in my scrap box.
The technique of cutting to shape is useful for finding ideas. Once you get your imagination involved, the choices are endless. You can cut teeth, bullets, the outline of your country or state, an animal, tree, or flower. You can use any combination of straight lines, concave or convex curves, or even irregular and jagged edges if it suits your purpose.
No matter what you're cutting, remember the fundamentals. You still need to taper the stone inward enough so the stone can be set. As on an oval, you can't leave any flat areas. They won't polish. And, always, cut a little, look a lot.
Ridges are a particularly useful technique. Besides adding interest to the stone, they can direct attention to a particular area or away from something less desirable. Look at stone #3 again. This would have been a plain cab were it not for the ridge that runs up the center and the plateau at the top. The ridge down the center causes the pattern to change direction. This is distinctive and gives the cab personality. There is some white at the top, and the steep angle and outline bring it into view. The white also serves to point to the center line, which is the main design feature. The design of stone #4 made extensive use of a ridge. It literally divides the stone in two. That was appropriate on this stone, as each section has a distinctive pattern.
For this project I used a piece of thulite, but this cutting technique can be used on any gem, light or dark, transparent or opaque. To begin, I pre-formed it as a square and beveled the edges at 45 degrees. Note the ridges at the corners. These will be emphasized throughout the project.

After tapering toward the crown, the stone was pyramid shaped. The ridges are distinct and run to a point. Points are prone to breakage, so the tip will be rounded off in the pre-polish stage.
![]()
Here is the stone after sanding with 600. The point has been rounded off and the sides squared up. Note that the ridges are not straight. That is a result of the inward taper not being even. From the side you'd see that the curvature is not symmetrical. To correct this, gently cut the high areas down with the 600 wheel.
![]() .
.
In this picture, the ridges have been straightened, but the sides need squaring again. This will be done on a 1200 wheel, as we begin pre-polishing.
![]() .
.
Here's the stone after the adjustments have been made. Now the stone has all the edges and ridges straight and the edges squared. I took off the point because it represented a weak area, but the stone still has four sharp corners. They could be just slightly rounded and protected by the setting. I intended to polish the stone from here, but the dark area was composed of coarser crystals than the rest and was unusually brittle. So I changed my plans and cut the corners off.
![]()
The corners were trimmed using a hard diamond wheel, rather than a padded one. The technique is to hold the corner to the wheel and grind in slightly. Then the stone was rotated toward the crown, shaving off the ridge. As with the ridges earlier, the corners were not in exact proportions to each other. The procedure was the same as before: sand down the high areas until they come into proportion.
![]()
Here is the finished stone. The highlights on the corners direct your attention inward. (This is seen clearer in the above photo.) That is the effect I wanted: to bring the viewer's attention into the stone. The trick to keeping ridges sharp is to cut parallel to them. Sanding over edges rounds them. You may run into trouble if you need to sand crosswise to remove scratches. In that case, bring the rest of the stone to a pre-polish. Then go back and re-cut your ridge, making it sharp. Finish by sanding and pre-polishing up to the ridge.
![]()
Concave curves can sometimes enhance your cabochon design concept. For example, a concave curve makes good use of the shape of this stone of crystallized silver in black matrix. There were mostly thin edges showing on the top. By widening the curve, I was able to show more of the crystal faces.
You cut a concave curve by placing the girdle edge of the cab against the cutting wheel. When it's deep enough, rotate the stone so it cuts in toward the crown. This is how you apply your taper. You can cut the curve as a semi-circle or as an arc as illustrated here. You don't need to cut a full side either. (This technique allowed me to get the dip on the top of agate stone #1 above).
There's no rule saying you have to polish every square millimeter on a gem. Frosted surfaces are highly visible. They can be used to highlight a feature in the stone's pattern, like choosing the proper frame for a picture, or to draw the viewer's attention away from an inclusion. (They also require less work!) In this tourmaline, a frosted ridge points to the color center, the area of most interest and serves to distract from the inclusions at the bottom. One of the best places for a frosted surface is the bottom of a transparent cab. Faceters know that their coarse laps leave subsurface fractures that need to be sanded out. Those same tiny fractures add sparkle and interest to cabochons.
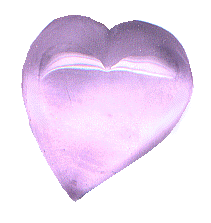
Here is a cute little freeform heart. The only surface polished is the center of the crown. It has small veils near the top and bottom, plus a large one that runs across the large lobe. The frosted pavilion camouflages them very well. The frosted outer edge points attention to the clear center.
Next: Cabochon carving techniques and how to hide inclusions in transparent cabochons.


When you join the IGS community, you get trusted diamond & gemstone information when you need it.
There are many kinds of lapidaries. Some gem cutters are content keeping their family in birthday and holiday presents. Some find fulfillment putting the most intricate cuts on cubic zirconia. Still others only cut stones they've personally found. Some of us consider ourselves serious gem cutters. Our goal is to facet the most beautiful gems possible and make the best use of the material nature provides us. However, we often fall short. Over the years, most of us have assembled a large collection of leftover rough. This consists of our not-so-exciting material. We haven't found the inspiration to cut these pieces, but they're still too good to throw away.
Practicing cutting cabochons, particularly with advanced techniques, is a great way to use those seconds that have been lying around too long.
The secret to advanced gemstone cutting is using your imagination. You may have cut hundreds or even thousands of ovals. For a change, try a fancy shape or maybe something functional like a cord pull, drawer handles, a recipe card holder, or some ear jackets.
When choosing a cut for a piece of rough, don't just look at its shape. Imagine how it will be used. Knowing if a piece is going to be used for a ring or bolo helps your cutting decisions. For example, sharp ridges on a ring stone would be vulnerable to impact and a poor choice. You can either avoid using that rough or find another use for the stone. This investigative process can lead to new ideas. You may come up with a broach or pendant design for your ridged stone you may not have thought of otherwise.
Some stones may look useless by themselves. Think about how they can be combined with other gems to make something useful. For example, long tourmaline crystals may be too thin to facet. However, they make excellent baguettes to accent other gems. This pink tourmaline started off measuring 12.3 x 3.3 x 2.1 mm deep. It was far too thin to facet, but look how nice it goes with blue apatite. I had this piece for years because it just didn't inspire me. Once I matched it with other stones, it only took five minutes to cut it and create a stunning piece of custom jewelry. Combining gems is one of the best imagination exercises you can do. Comparing shapes, colors, sizes, and textures will help you find combinations you would otherwise have missed. This applies to both gem cutting and jewelry design.
If you have a lot of small gems and little inspiration, try turning them into cabochons. A quick and simple dome can turn a wasted piece of rough into a useful gem. If matched in size and color, a bunch of cabbed domes can be used in a cluster. You can turn your junk into something valuable in five to ten minutes.
(Our article, "Fundamentals of Lapidary Part 4," has information on how to cut cabochons on a faceting machine).
One of the easiest ways to make your cabs special is to give them unique shapes. People often ask me how to do a freeform cut. In most cases, the answer is simple. Just follow the outline of your material and cut it for maximum yield. I recently cut the prettiest oval I could find from a piece of ribbon agate. These are the pieces I had left after sawing.
Here are the same pieces, freeform cut primarily by following the shape.
I was very pleased with how the pattern developed while cutting stone #1. It's large and will make a stunning bolo. Stone #3 has a simple pattern. I used a combination of asymmetrical curves and ridges to add interest to it. It'll make a nice pendant. Stone #4 has a whimsical, sci-fi look to it. This will make a custom pendant, bracelet, or belt buckle. Unfortunately, stone #2 was unusable. Still, I turned three out of four leftovers into nice gems. They may not be high art but they're much nicer than if they were still sitting in my scrap box.
The technique of cutting to shape is useful for finding ideas. Once you get your imagination involved, the choices are endless. You can cut teeth, bullets, the outline of your country or state, an animal, tree, or flower. You can use any combination of straight lines, concave or convex curves, or even irregular and jagged edges if it suits your purpose.
No matter what you're cutting, remember the fundamentals. You still need to taper the stone inward enough so the stone can be set. As on an oval, you can't leave any flat areas. They won't polish. And, always, cut a little, look a lot.
Ridges are a particularly useful technique. Besides adding interest to the stone, they can direct attention to a particular area or away from something less desirable. Look at stone #3 again. This would have been a plain cab were it not for the ridge that runs up the center and the plateau at the top. The ridge down the center causes the pattern to change direction. This is distinctive and gives the cab personality. There is some white at the top, and the steep angle and outline bring it into view. The white also serves to point to the center line, which is the main design feature. The design of stone #4 made extensive use of a ridge. It literally divides the stone in two. That was appropriate on this stone, as each section has a distinctive pattern.
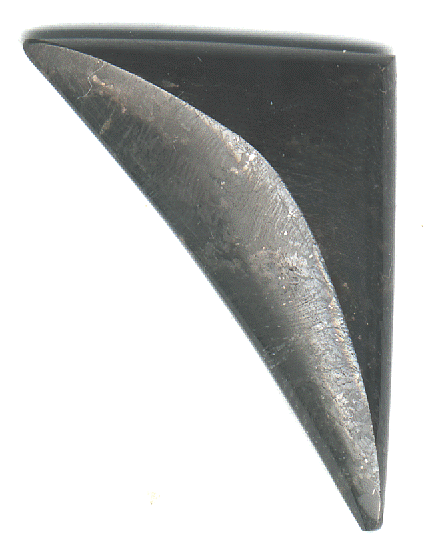
For this project I used a piece of thulite, but this cutting technique can be used on any gem, light or dark, transparent or opaque. To begin, I pre-formed it as a square and beveled the edges at 45 degrees. Note the ridges at the corners. These will be emphasized throughout the project.
After tapering toward the crown, the stone was pyramid shaped. The ridges are distinct and run to a point. Points are prone to breakage, so the tip will be rounded off in the pre-polish stage.
![]()
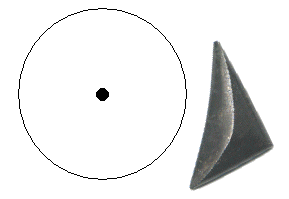
Here is the stone after sanding with 600. The point has been rounded off and the sides squared up. Note that the ridges are not straight. That is a result of the inward taper not being even. From the side you'd see that the curvature is not symmetrical. To correct this, gently cut the high areas down with the 600 wheel.
![]() .
.
In this picture, the ridges have been straightened, but the sides need squaring again. This will be done on a 1200 wheel, as we begin pre-polishing.
![]() .
.
Here's the stone after the adjustments have been made. Now the stone has all the edges and ridges straight and the edges squared. I took off the point because it represented a weak area, but the stone still has four sharp corners. They could be just slightly rounded and protected by the setting. I intended to polish the stone from here, but the dark area was composed of coarser crystals than the rest and was unusually brittle. So I changed my plans and cut the corners off.
![]()
The corners were trimmed using a hard diamond wheel, rather than a padded one. The technique is to hold the corner to the wheel and grind in slightly. Then the stone was rotated toward the crown, shaving off the ridge. As with the ridges earlier, the corners were not in exact proportions to each other. The procedure was the same as before: sand down the high areas until they come into proportion.
![]()
Here is the finished stone. The highlights on the corners direct your attention inward. (This is seen clearer in the above photo.) That is the effect I wanted: to bring the viewer's attention into the stone. The trick to keeping ridges sharp is to cut parallel to them. Sanding over edges rounds them. You may run into trouble if you need to sand crosswise to remove scratches. In that case, bring the rest of the stone to a pre-polish. Then go back and re-cut your ridge, making it sharp. Finish by sanding and pre-polishing up to the ridge.
![]()
Concave curves can sometimes enhance your cabochon design concept. For example, a concave curve makes good use of the shape of this stone of crystallized silver in black matrix. There were mostly thin edges showing on the top. By widening the curve, I was able to show more of the crystal faces.
You cut a concave curve by placing the girdle edge of the cab against the cutting wheel. When it's deep enough, rotate the stone so it cuts in toward the crown. This is how you apply your taper. You can cut the curve as a semi-circle or as an arc as illustrated here. You don't need to cut a full side either. (This technique allowed me to get the dip on the top of agate stone #1 above).
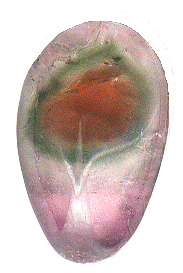
There's no rule saying you have to polish every square millimeter on a gem. Frosted surfaces are highly visible. They can be used to highlight a feature in the stone's pattern, like choosing the proper frame for a picture, or to draw the viewer's attention away from an inclusion. (They also require less work!) In this tourmaline, a frosted ridge points to the color center, the area of most interest and serves to distract from the inclusions at the bottom. One of the best places for a frosted surface is the bottom of a transparent cab. Faceters know that their coarse laps leave subsurface fractures that need to be sanded out. Those same tiny fractures add sparkle and interest to cabochons.
Here is a cute little freeform heart. The only surface polished is the center of the crown. It has small veils near the top and bottom, plus a large one that runs across the large lobe. The frosted pavilion camouflages them very well. The frosted outer edge points attention to the clear center.


