

In Part 3 of “Faceting Made Easy,” Trevor Hannam covers how to select gem rough as well as dopping and rounding techniques for a standard brilliant cut.
14 Minute Read
Note: This is a six-part edited version of Trevor Hannam's Faceting Made Easy, a general introduction to faceting and a guide for learning to cut a standard brilliant gem. Part 3 includes Chapters 5, 6, 7, and 8. These chapters cover selecting rough and dopping and rounding techniques for a standard brilliant cut. The International Gem Society thanks Mr. Hannam for permission to post his work.
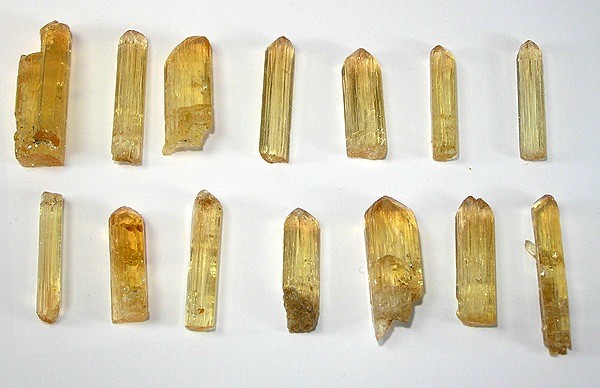
For beginners, let's start with a piece of topaz. With its good relative hardness and refractive index (RI), this inexpensive mineral will produce gems with sparkling brilliance.
When choosing your rough, look at these three factors: clarity, color, and cleavage.
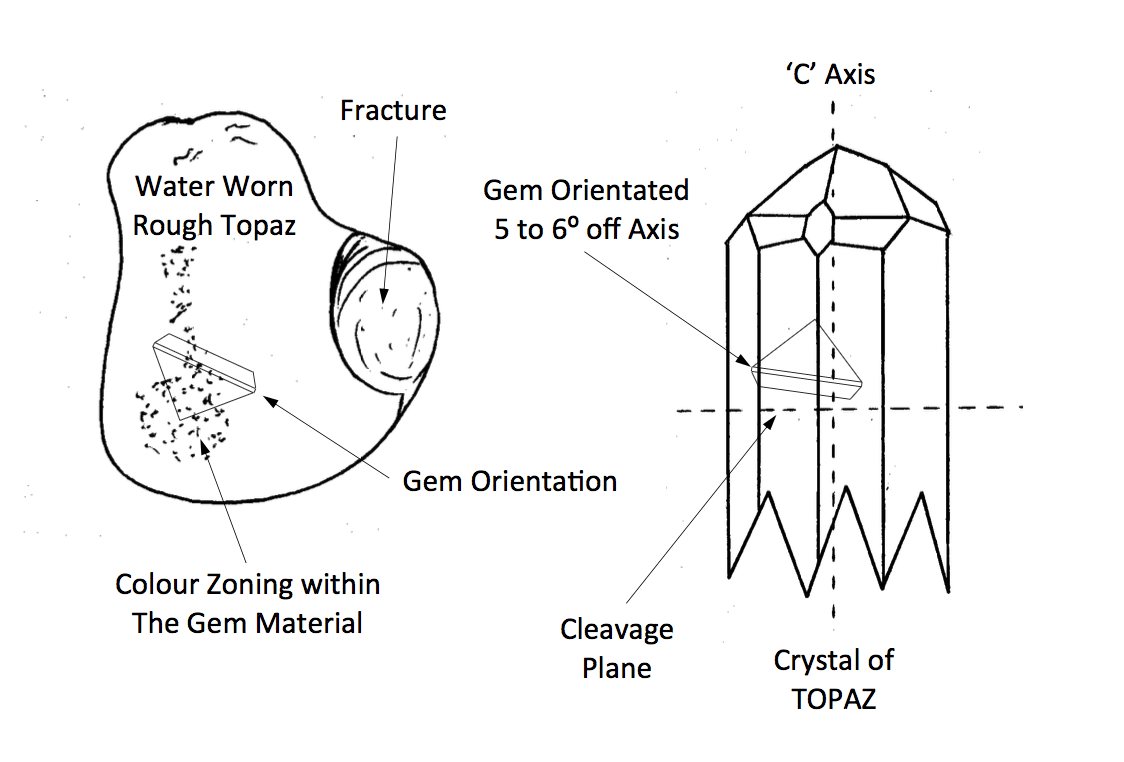
Let's say you have a piece of topaz that may not have the outward shape of a crystal. For example, it may be water worn and impossible to see through. You need to evaluate its clarity or clearness. Wetting it with water may help, but not enough to see any inclusions and internal flaws. This is due to water's RI (1.33) not being high enough. To view readily the inside of this stone, you need a liquid with an RI closer to topaz's (1.63). You'll need Refractol or cinnamon oil. With an artist's brush, paint one of these liquids over the stone. You'll then be able to see right through the piece as if it were a piece of glass.
Look carefully into the stone with a five or ten power eye piece for any of the following:
Obviously, you want a near flawless stone. As Nature will have it, tis 'nigh impossible. However, the art of faceting allows you to find the flaws and hide them if they present problems. With the proper gem orientation, you can conceal inclusions or flaws under the girdle facets. Normally, you wouldn't bother with such a stone, but special circumstances might factor into your decision. (Perhaps the rough is a unique piece, has sentimental value, or commands a high price). Barring special circumstances, you'd likely discard such a stone for a better piece.
Now, you've mapped out the interior of the rough. Next, you can consider possible orientations and maximum recovery for the stone.
Does the rough you're examining have any color zoning? Is the color uniform, or is it lighter on one side than the other?
Stones like amethyst, citrine, sapphire and blue topaz can have one or more bands of color. If color is the most important value factor for what you're cutting (and, normally, it is), then orient such banded rough so that the pavilion of the standard brilliant, when cut, is fully within the banding. Take care that the pavilion doesn't protrude past this color zone point. This may lead to a loss of the desired color.
Don't confuse color banding with pleochroism in doubly refractive gems, such as sapphires. For best color, particularly cornflower blue, orient sapphires along their C axis. Otherwise, you may very well end up with a green sapphire. (See Part 1).
Topaz has a cleavage plane, which may or may not give you problems when polishing.
If your rough has a crystal shape or shows the cleavage plane easily, you'll have no worries. Orientation will be easy. However, what if you have a water-worn stone with no indication of the cleavage plane? I suggest you just go ahead and orient the stone as if it had no cleavage. You have about a thousand-to-one chance of placing a stone exactly on the cleavage line. This subject has received far too much emphasis. Even if you've placed the cleavage on one of the facets to be polished, you won't have a real problem. In Part 5, we'll discuss the hand polishing technique.
So, if your piece shows the cleavage (which is 90° from the C axis), orient the piece approximately 5 to 6° away from the axis.
The first faceted stones appeared around the late 14th to 15th centuries. For some time after, lapidaries passed down the knowledge of gem faceting as family secrets. Beginning in the 19th century, however, the art of faceting became accessible to all amateurs and hobbyists. Today, of course, enthusiasts can find many books on the subject, and many clubs are willing to teach this art.
The standard brilliant cut starts with a piece of rough that you'll round. Then, you'll place a combination of facets in geometrical patterns around the stone. Utilizing the optical properties of the gem, they will produce a brilliance pleasing to any beholder.
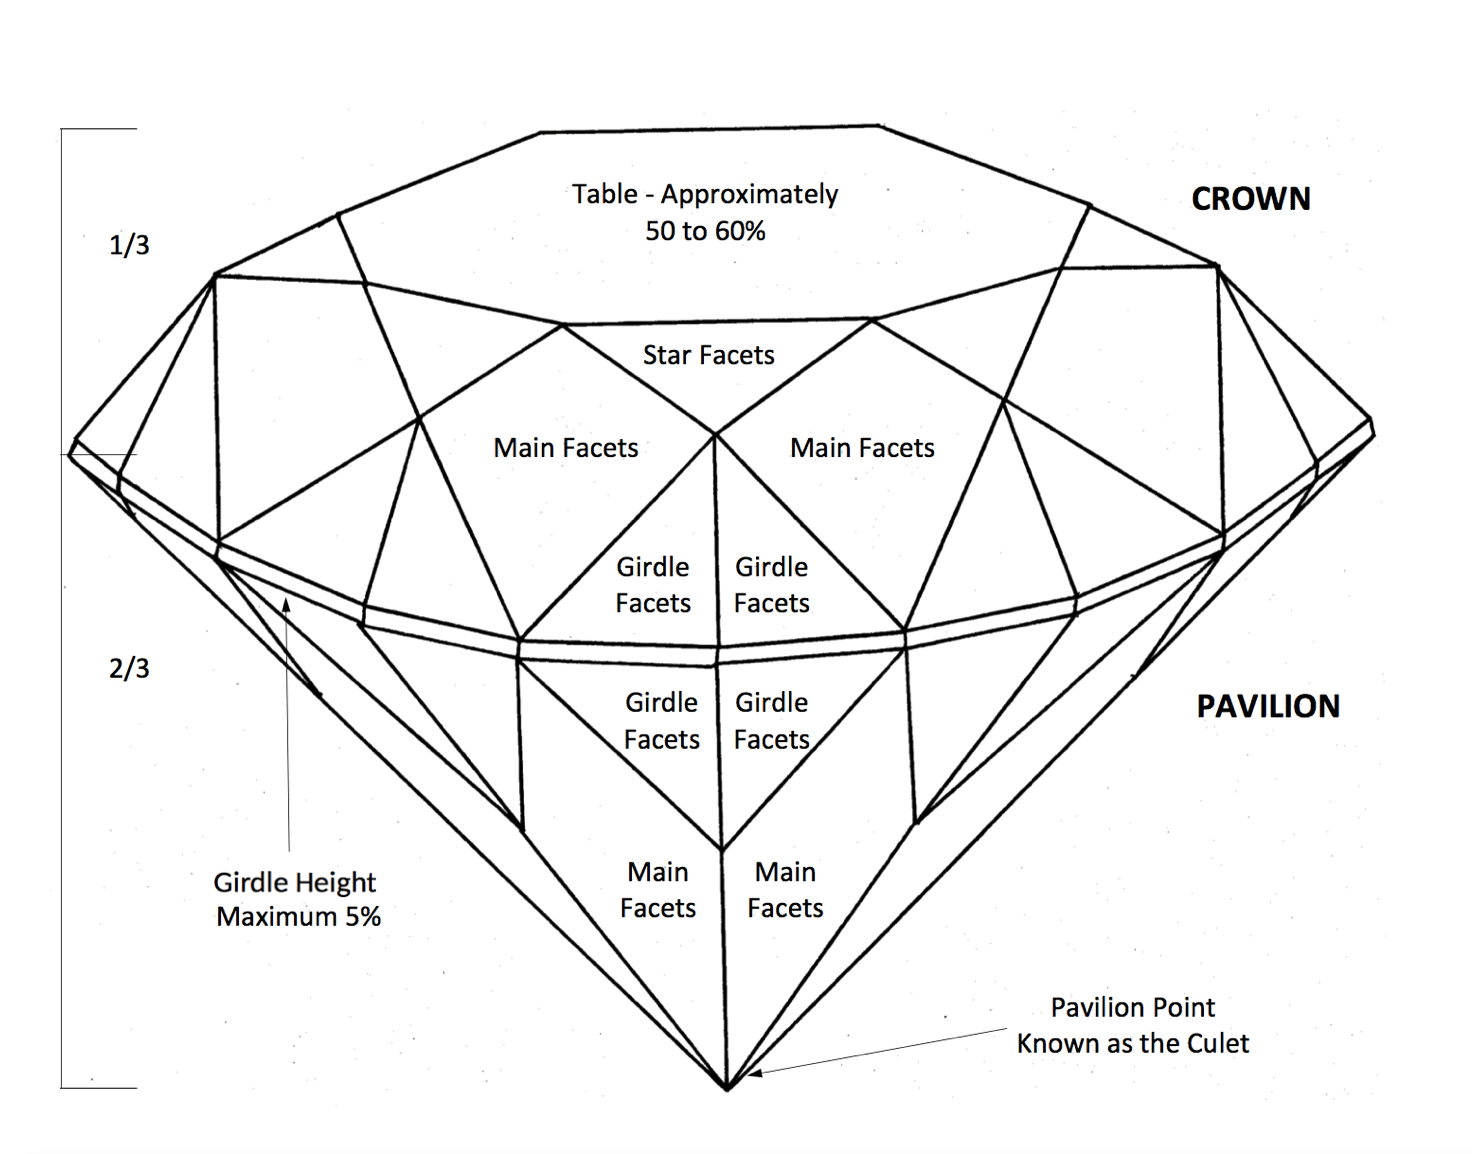
The standard brilliant cut has 57 facets.
The crown totals approximately 1/3 of the height of the finished gem. It consists of 33 facets: 8 main facets, 16 girdle facets, 8 star facets, and 1 table facet.
The pavilion totals approximately 2/3 of the height of the finished gem. It consists of 24 facets: 8 main facets and 16 girdle facets.
The maximum girdle height of a standard brilliant cut must not exceed 5% of the finished gem's height.
In some circumstances, you can cut the culet as a small, flat facet to prevent it from fracturing. At times, this is considered good practice.
Dopping is one of the most important parts of faceting. You must learn to do this correctly. There's nothing worse, especially for a beginner, than having a gem fall off the dop at a crucial point due to improper dopping.
Select the right dop stick for the stone, approximately 50 to 60% of the size of the finished article. This will come to you with trial and error. After a while, you'll be able to estimate with some accuracy the correct dop stick for the job.
Once you've oriented the stone properly, grind a small flat surface on the stone to accommodate the dop stick. Do this by placing the coarse lap (220 grit) onto the faceting machine's master lap. Turn on the water container tap so a reasonable flow runs onto the center area of the lap surface. Set the machine's speed to high.
Bring the stone to the surface of the spinning lap. Using light pressure, proceed to cut a small flat surface for dopping.
Wet a piece of toilet tissue with methylated spirits and clean the ground area. (Don't forget to turn off the water and the machine. Also, leave the lap on the machine for the next phase of faceting). Paint this cleaned area with a very thin film of dop help. The dop help will act as a binder for the transition of wax to metal.
Some stones have considerable heat sensitivity. For these, use modern epoxies, like Tite On or Weld-It, which cure fully in 4 hours. (See the section on "Using Epoxies," below).
Set up your heater oven. Place the stone, painted side up, onto the oven's top. Then, place the spirit lamp underneath the oven and light it.
With experience, you'll learn to gauge the right amount of heat. In the meantime, use the following technique as a guideline. Keep lifting the stone with your fingers until you can only hold it for a couple of seconds. That will indicate you've reached approximately the right temperature.
While the stone is warming, place your selected dop stick in one of your dop stick holders.
Heat the end of the dop stick by placing the end into the flame. When reasonably hot, bring the faceter's wax into the flame with the dop stick. Then, melt some of the wax onto the surface to form a small ball of melted wax. During this procedure, you may have to keep the dop stick moving around to retain the wax on the end. Continue to heat until the wax just catches fire. This indicates you've reached the right temperature for fixing.
Immediately place the waxed end of the dop stick onto the surface of the stone's painted side. Lift the combination from the oven and gently, before it cools, move the stone around until it's in the right position. BE VERY CAREFUL HERE AS THE STONE IS QUITE WARM! (Now you can appreciate the benefits of dop stick holders).
Put the dopped stone aside to cool down and prepare your faceting machine for the next phase of your work.
Epoxies offer faceters a simpler alternative to wax. Both epoxies and super glues (401 cyanoacrylate) are very reliable and have the advantage of working at room temperatures. They're also better at keeping stones from shifting due to heat buildup during transferring. They will save you many a burnt finger, which I readily appreciate.
On the other hand, epoxies and cyanoacrylates can present problems, too, particularly when removing the adhesives from a stone. MEK (methyl ethyl ketone) thinners and/or acetone will help release most epoxies and super glues. However, heat remains the best option for prying a gem away from the dop stick. For another approach, place the dop and gem in a freezer for 15-20 minutes, then pry them apart. (This may not always work).
Make sure you've cleaned the ground-flat area on your stone with methylated spirits. Clean the head of your dop stick thoroughly, too. You may even have to use a piece of wet and dry silicon carbide paper or similar to clean it.
For Tite On or Weld-It, mix well together equal parts base and hardener. Place a small amount on the dop stick and press into the flat area of your stone. Set aside for at least a ½ hour for best results.
I don't really recommend using super glue for initial stone dopping. However, if a stone falls off the dop while cutting, you can use super glue to reattach it easily. I have found super glues far better suited for transferring dopped stones. (See Part 5).
In summary, wax has the advantage over epoxy with quick drying times. This means you could be faceting in just a few minutes after dopping. However, if you can wait, I recommend using epoxy. It's up to you!
For generations, most faceting instructors have taught their students to first cut the crown, then the pavilion. Here, we'll do the pavilion first and the crown and table facets last.
This approach allows both amateurs and professionals to estimate more accurately the depth of material left for the crown. In addition, gem cutters will have better control over facet placement and hiding flaws under facets, as well as an easier time with the pavilion/crown transfer on the transfer jig.
However, this technique does have a downside. The table facet (the last one cut) must be "sat" on the star facets. So, it must meet at every point. (Consider this good practice for when you venture into the art of meetpoint faceting).
Set the index wheel of your faceting machine into free wheel and the protractor to 90°. Place your coarse lap (220 grit) onto the master lap and secure the nut firmly.
Now, place the dop stick with the dopped stone into the chuck of the quill. Some faceting machines, like the Halls, have specially shaped dop sticks that fit directly into the quill. If your machine doesn't have this facility, just place the dop 2/3 of the way into the chuck. Tighten the chuck firmly.
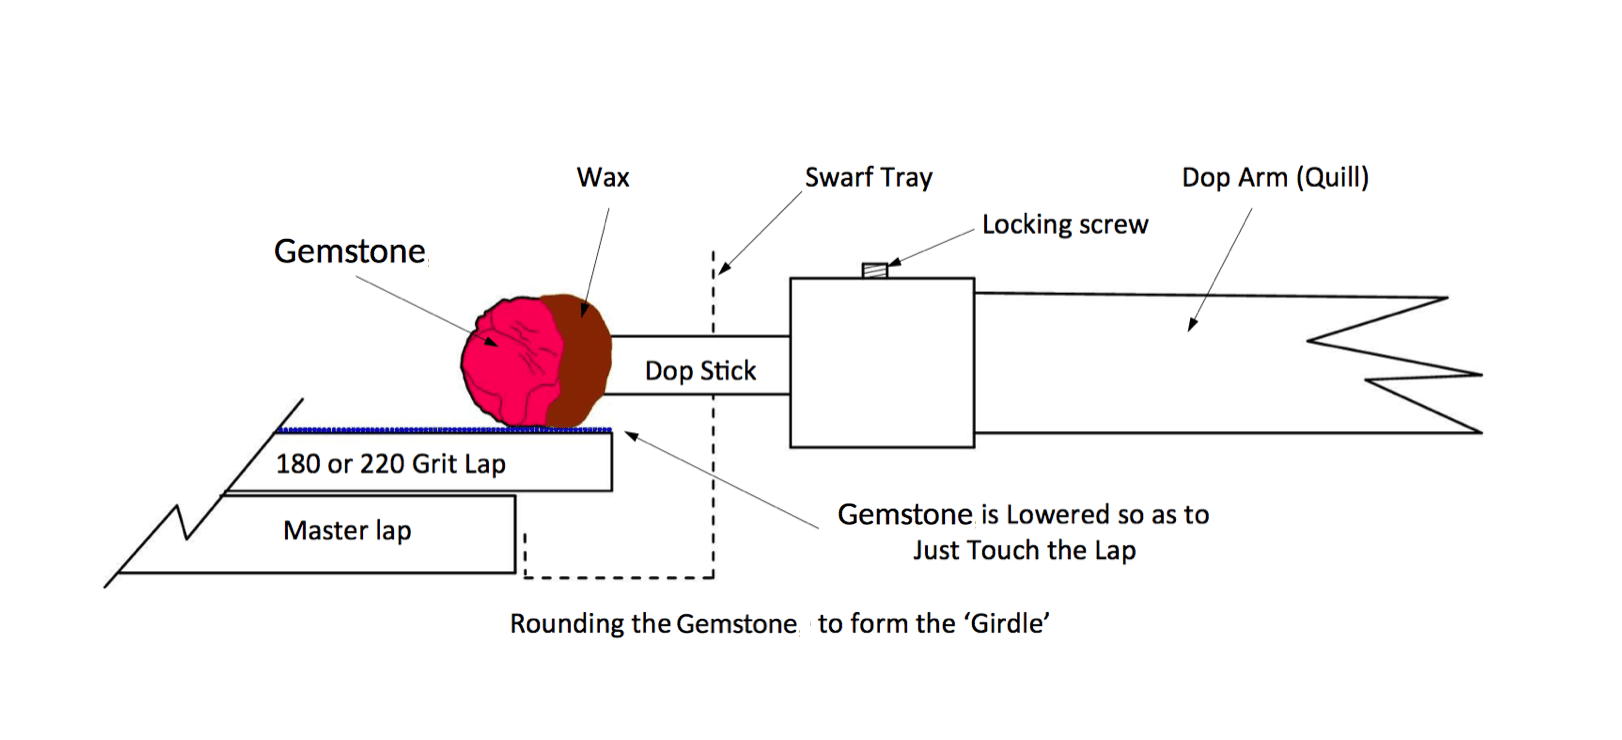
Lift the gate of the swarf tray and undo the coarse height adjusting wheel to free the head assembly. Next, carefully lower the head so the dopped stone rests lightly on the coarse lap's edge. Then, re-tighten the coarse adjuster. Refer to the diagram below.
Now, raise the stone slightly off the lap by using the micro height adjuster.
Start the machine at fast speed. Then, turn on the water at a reasonable rate, so it flows outward from the center of the lap.
Slowly lower the quill with your micro height adjuster until you hear it grinding against the lap.
Rotate the gem/quill assembly slowly in a counterclockwise direction. (That is, against the rotation of the lap). Until you've gained some experience with rounding, stick to the counterclockwise direction. Otherwise, the lap might grab the gem and throw it off.
Keep turning until you hear a change in the grinding. This happens as you near the bottom of the stop. (The stop marks the maximum cutting depth. It's designed so you can't cut any farther than where you've set the angle).
Lift the stone off the lap and look at what's happening. You'll notice some parts of the stone have been ground but not others. Still, at this point, you should see some rounding effect.
Continue lowering and grinding until the stone begins to look reasonably round. Always stop and examine your work until you feel comfortable with what you're doing.
Keep rounding by lowering and cutting until you hear the action of the cutting stop. Check your progress until you think it's right. Your vernier calipers will come in handy for checking if the gem is out of round.
Mastering the art of rounding takes a bit of practice. "Near enough is good enough" doesn't apply here. You must strive to get it perfect. Any variation, no matter how small, can cause errors in your facet sizes that will progressively get worse. Everyone has difficulties getting it right, so don't feel put off. Practice makes perfect.
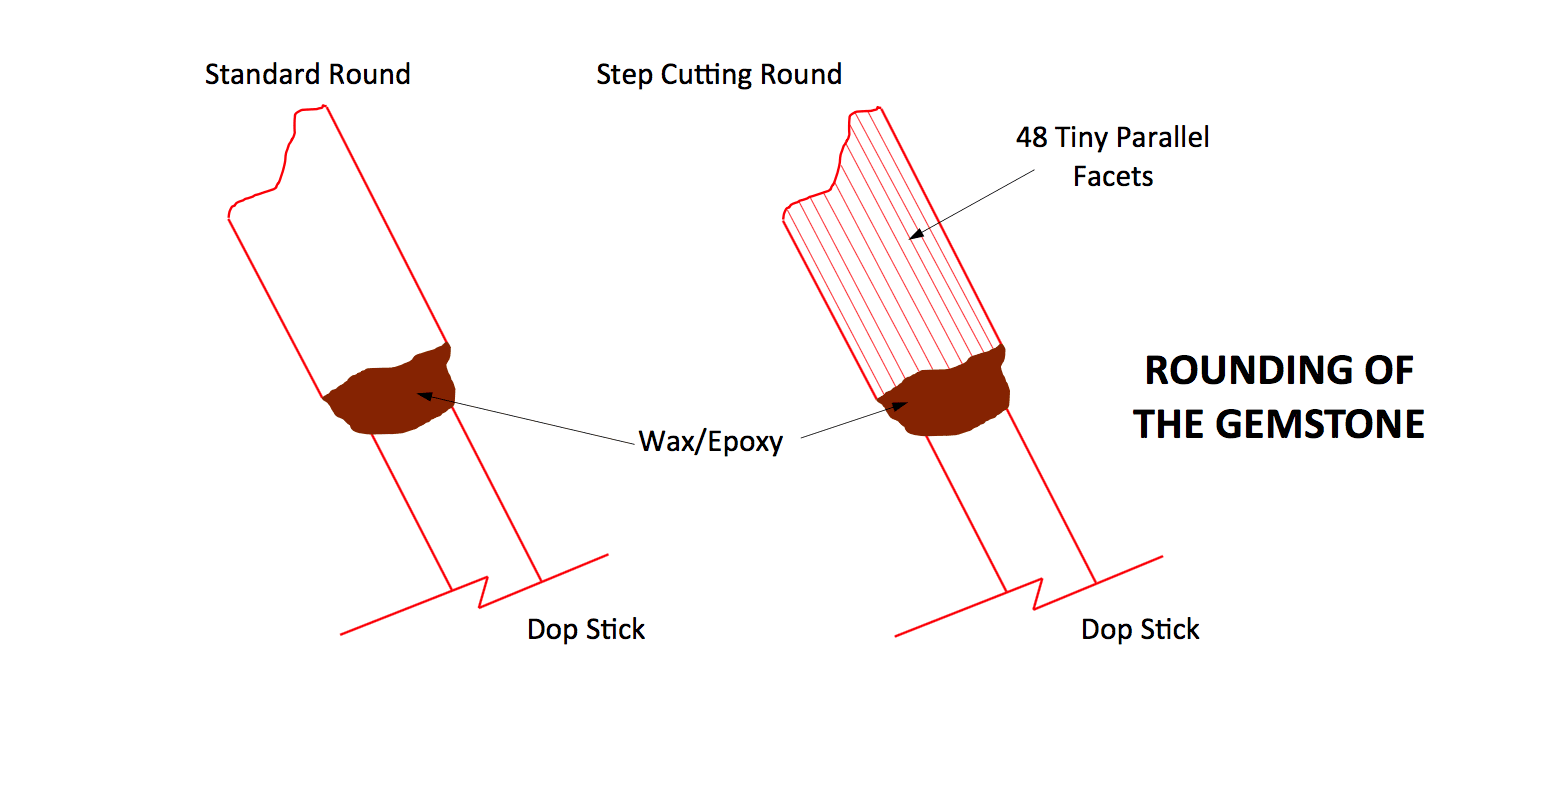
If you have difficulties with rounding, it's likely due to using too much pressure at parts, which causes over-cutting. To solve this problem, I suggest you recut the stone in steps using a 1,200 grit pre-polish lap. (See the section on "Pre-Polishing the Girdle," below). Do this by using the index gear set at 2 indices every cut. Using a 96 index wheel will produce the 48 facets needed.
Leave the assembly in the same position and place your index gear on 96. Lower the quill until cutting resumes and cut to the stop. Then, go to index 2. (Since you've now established the depth, you don't need to lower the quill again). Repeat for all other indices (4, 6, 8, 10, 12, etc.,) until you're back at index 96. Always try and use the same pressure. This will help prevent over-cutting (pushing past the stop).
When you finish, you should have 48 tiny parallel facets, as shown below. This now called the girdle. (Please note, these are not the girdle facets defined in the "Standard Brilliant Cut Terminology" section. Parts 4 and 5 will cover those facets in the pavilion and crown sections).
Don't forget to turn off your water when you finish.
You've now formed your gemstone's girdle. It was hard, but you got there. Raise your quill away from the machine, remove the coarse lap, and place it in its holder.
At this point, check for inclusions and flaws you could have missed when viewing the rough. Paint a little Refractol on the surface and do another check. If you see some inclusions or flaws, try and hide them under the girdle facets. Alternatively, they might cut out when you do the pavilion. You must decide now whether you should go on or not.
Clean everything, including the gemstone still in the quill. Cleanliness is most important during these lap changes. Make sure to clean wherever your hand rested against the swarf tray. Any contamination going forward can ruin all your work as well as the laps.
Next, we put on the pre-polish lap. (Review how to prepare this lap). Don't use water yet on this newly prepared lap.
As before, lower the quill until it just touches the lap. Then, lift the quill from the lap and start the machine. This time, use only slow to moderate speed. (You don't want to throw off all your diamond powder).
Whether you're doing the girdle the "round" way or the faceted way, use very light pressure until you gain more experience.
If you're rounding the girdle, set the index wheel to "free wheel." It should be turned against the rotation (counterclockwise).
If you're faceting the girdle (see the "Cutting the Girdle" section, above), start on index 96, then go to 2, and progressively cut every 2 indices until you complete all facets.
Remember, at this stage, we're just trying to remove the scratches from the last lap. Since newly prepared laps cut fast, you don't need to remove much material. When the facets look satiny all over, they're done.
If the lap seems too dry, add a couple of drops of cleaner or polish extender onto it. Spread it with a finger. This may get a bit messy with the oil, but that's why you have the tissues handy.
Always clean the stone every time you need to look at it.
Check to make sure you have the girdle as round as you can get it. Once that's done, lift the quill and put away your pre-polish lap.
You may have noticed you didn't need to use water at this time. This is because you're using the gem to push diamond powder into the copper lap, just like when you rolled the coarse lap. Later though, this won't be the case. Since the diamond is already pushed in, the oil becomes fouled and forms a barrier. This makes the lap more difficult to use. In this case, wash the lap with hot, soapy water to remove all the swarf. From that stage forward, you'll use water as a lubricant.
By using the lap in this manner, you'll get the most benefit from the pre-polish powder. With a measly amount of diamond powder, you'll be able to do 3, 4, or more gemstones.
The next step for the standard brilliant cut is the pavilion.


When you join the IGS community, you get trusted diamond & gemstone information when you need it.
Note: This is a six-part edited version of Trevor Hannam's Faceting Made Easy, a general introduction to faceting and a guide for learning to cut a standard brilliant gem. Part 3 includes Chapters 5, 6, 7, and 8. These chapters cover selecting rough and dopping and rounding techniques for a standard brilliant cut. The International Gem Society thanks Mr. Hannam for permission to post his work.
For beginners, let's start with a piece of topaz. With its good relative hardness and refractive index (RI), this inexpensive mineral will produce gems with sparkling brilliance.
When choosing your rough, look at these three factors: clarity, color, and cleavage.
Let's say you have a piece of topaz that may not have the outward shape of a crystal. For example, it may be water worn and impossible to see through. You need to evaluate its clarity or clearness. Wetting it with water may help, but not enough to see any inclusions and internal flaws. This is due to water's RI (1.33) not being high enough. To view readily the inside of this stone, you need a liquid with an RI closer to topaz's (1.63). You'll need Refractol or cinnamon oil. With an artist's brush, paint one of these liquids over the stone. You'll then be able to see right through the piece as if it were a piece of glass.
Look carefully into the stone with a five or ten power eye piece for any of the following:
Obviously, you want a near flawless stone. As Nature will have it, tis 'nigh impossible. However, the art of faceting allows you to find the flaws and hide them if they present problems. With the proper gem orientation, you can conceal inclusions or flaws under the girdle facets. Normally, you wouldn't bother with such a stone, but special circumstances might factor into your decision. (Perhaps the rough is a unique piece, has sentimental value, or commands a high price). Barring special circumstances, you'd likely discard such a stone for a better piece.
Now, you've mapped out the interior of the rough. Next, you can consider possible orientations and maximum recovery for the stone.
Does the rough you're examining have any color zoning? Is the color uniform, or is it lighter on one side than the other?
Stones like amethyst, citrine, sapphire and blue topaz can have one or more bands of color. If color is the most important value factor for what you're cutting (and, normally, it is), then orient such banded rough so that the pavilion of the standard brilliant, when cut, is fully within the banding. Take care that the pavilion doesn't protrude past this color zone point. This may lead to a loss of the desired color.
Don't confuse color banding with pleochroism in doubly refractive gems, such as sapphires. For best color, particularly cornflower blue, orient sapphires along their C axis. Otherwise, you may very well end up with a green sapphire. (See Part 1).
Topaz has a cleavage plane, which may or may not give you problems when polishing.
If your rough has a crystal shape or shows the cleavage plane easily, you'll have no worries. Orientation will be easy. However, what if you have a water-worn stone with no indication of the cleavage plane? I suggest you just go ahead and orient the stone as if it had no cleavage. You have about a thousand-to-one chance of placing a stone exactly on the cleavage line. This subject has received far too much emphasis. Even if you've placed the cleavage on one of the facets to be polished, you won't have a real problem. In Part 5, we'll discuss the hand polishing technique.
So, if your piece shows the cleavage (which is 90° from the C axis), orient the piece approximately 5 to 6° away from the axis.
The first faceted stones appeared around the late 14th to 15th centuries. For some time after, lapidaries passed down the knowledge of gem faceting as family secrets. Beginning in the 19th century, however, the art of faceting became accessible to all amateurs and hobbyists. Today, of course, enthusiasts can find many books on the subject, and many clubs are willing to teach this art.
The standard brilliant cut starts with a piece of rough that you'll round. Then, you'll place a combination of facets in geometrical patterns around the stone. Utilizing the optical properties of the gem, they will produce a brilliance pleasing to any beholder.
The standard brilliant cut has 57 facets.
The crown totals approximately 1/3 of the height of the finished gem. It consists of 33 facets: 8 main facets, 16 girdle facets, 8 star facets, and 1 table facet.
The pavilion totals approximately 2/3 of the height of the finished gem. It consists of 24 facets: 8 main facets and 16 girdle facets.
The maximum girdle height of a standard brilliant cut must not exceed 5% of the finished gem's height.
In some circumstances, you can cut the culet as a small, flat facet to prevent it from fracturing. At times, this is considered good practice.
Dopping is one of the most important parts of faceting. You must learn to do this correctly. There's nothing worse, especially for a beginner, than having a gem fall off the dop at a crucial point due to improper dopping.
Select the right dop stick for the stone, approximately 50 to 60% of the size of the finished article. This will come to you with trial and error. After a while, you'll be able to estimate with some accuracy the correct dop stick for the job.
Once you've oriented the stone properly, grind a small flat surface on the stone to accommodate the dop stick. Do this by placing the coarse lap (220 grit) onto the faceting machine's master lap. Turn on the water container tap so a reasonable flow runs onto the center area of the lap surface. Set the machine's speed to high.
Bring the stone to the surface of the spinning lap. Using light pressure, proceed to cut a small flat surface for dopping.
Wet a piece of toilet tissue with methylated spirits and clean the ground area. (Don't forget to turn off the water and the machine. Also, leave the lap on the machine for the next phase of faceting). Paint this cleaned area with a very thin film of dop help. The dop help will act as a binder for the transition of wax to metal.
Some stones have considerable heat sensitivity. For these, use modern epoxies, like Tite On or Weld-It, which cure fully in 4 hours. (See the section on "Using Epoxies," below).
Set up your heater oven. Place the stone, painted side up, onto the oven's top. Then, place the spirit lamp underneath the oven and light it.
With experience, you'll learn to gauge the right amount of heat. In the meantime, use the following technique as a guideline. Keep lifting the stone with your fingers until you can only hold it for a couple of seconds. That will indicate you've reached approximately the right temperature.
While the stone is warming, place your selected dop stick in one of your dop stick holders.
Heat the end of the dop stick by placing the end into the flame. When reasonably hot, bring the faceter's wax into the flame with the dop stick. Then, melt some of the wax onto the surface to form a small ball of melted wax. During this procedure, you may have to keep the dop stick moving around to retain the wax on the end. Continue to heat until the wax just catches fire. This indicates you've reached the right temperature for fixing.
Immediately place the waxed end of the dop stick onto the surface of the stone's painted side. Lift the combination from the oven and gently, before it cools, move the stone around until it's in the right position. BE VERY CAREFUL HERE AS THE STONE IS QUITE WARM! (Now you can appreciate the benefits of dop stick holders).
Put the dopped stone aside to cool down and prepare your faceting machine for the next phase of your work.
Epoxies offer faceters a simpler alternative to wax. Both epoxies and super glues (401 cyanoacrylate) are very reliable and have the advantage of working at room temperatures. They're also better at keeping stones from shifting due to heat buildup during transferring. They will save you many a burnt finger, which I readily appreciate.
On the other hand, epoxies and cyanoacrylates can present problems, too, particularly when removing the adhesives from a stone. MEK (methyl ethyl ketone) thinners and/or acetone will help release most epoxies and super glues. However, heat remains the best option for prying a gem away from the dop stick. For another approach, place the dop and gem in a freezer for 15-20 minutes, then pry them apart. (This may not always work).
Make sure you've cleaned the ground-flat area on your stone with methylated spirits. Clean the head of your dop stick thoroughly, too. You may even have to use a piece of wet and dry silicon carbide paper or similar to clean it.
For Tite On or Weld-It, mix well together equal parts base and hardener. Place a small amount on the dop stick and press into the flat area of your stone. Set aside for at least a ½ hour for best results.
I don't really recommend using super glue for initial stone dopping. However, if a stone falls off the dop while cutting, you can use super glue to reattach it easily. I have found super glues far better suited for transferring dopped stones. (See Part 5).
In summary, wax has the advantage over epoxy with quick drying times. This means you could be faceting in just a few minutes after dopping. However, if you can wait, I recommend using epoxy. It's up to you!
For generations, most faceting instructors have taught their students to first cut the crown, then the pavilion. Here, we'll do the pavilion first and the crown and table facets last.
This approach allows both amateurs and professionals to estimate more accurately the depth of material left for the crown. In addition, gem cutters will have better control over facet placement and hiding flaws under facets, as well as an easier time with the pavilion/crown transfer on the transfer jig.
However, this technique does have a downside. The table facet (the last one cut) must be "sat" on the star facets. So, it must meet at every point. (Consider this good practice for when you venture into the art of meetpoint faceting).
Set the index wheel of your faceting machine into free wheel and the protractor to 90°. Place your coarse lap (220 grit) onto the master lap and secure the nut firmly.
Now, place the dop stick with the dopped stone into the chuck of the quill. Some faceting machines, like the Halls, have specially shaped dop sticks that fit directly into the quill. If your machine doesn't have this facility, just place the dop 2/3 of the way into the chuck. Tighten the chuck firmly.
Lift the gate of the swarf tray and undo the coarse height adjusting wheel to free the head assembly. Next, carefully lower the head so the dopped stone rests lightly on the coarse lap's edge. Then, re-tighten the coarse adjuster. Refer to the diagram below.
Now, raise the stone slightly off the lap by using the micro height adjuster.
Start the machine at fast speed. Then, turn on the water at a reasonable rate, so it flows outward from the center of the lap.
Slowly lower the quill with your micro height adjuster until you hear it grinding against the lap.
Rotate the gem/quill assembly slowly in a counterclockwise direction. (That is, against the rotation of the lap). Until you've gained some experience with rounding, stick to the counterclockwise direction. Otherwise, the lap might grab the gem and throw it off.
Keep turning until you hear a change in the grinding. This happens as you near the bottom of the stop. (The stop marks the maximum cutting depth. It's designed so you can't cut any farther than where you've set the angle).
Lift the stone off the lap and look at what's happening. You'll notice some parts of the stone have been ground but not others. Still, at this point, you should see some rounding effect.
Continue lowering and grinding until the stone begins to look reasonably round. Always stop and examine your work until you feel comfortable with what you're doing.
Keep rounding by lowering and cutting until you hear the action of the cutting stop. Check your progress until you think it's right. Your vernier calipers will come in handy for checking if the gem is out of round.
Mastering the art of rounding takes a bit of practice. "Near enough is good enough" doesn't apply here. You must strive to get it perfect. Any variation, no matter how small, can cause errors in your facet sizes that will progressively get worse. Everyone has difficulties getting it right, so don't feel put off. Practice makes perfect.
If you have difficulties with rounding, it's likely due to using too much pressure at parts, which causes over-cutting. To solve this problem, I suggest you recut the stone in steps using a 1,200 grit pre-polish lap. (See the section on "Pre-Polishing the Girdle," below). Do this by using the index gear set at 2 indices every cut. Using a 96 index wheel will produce the 48 facets needed.
Leave the assembly in the same position and place your index gear on 96. Lower the quill until cutting resumes and cut to the stop. Then, go to index 2. (Since you've now established the depth, you don't need to lower the quill again). Repeat for all other indices (4, 6, 8, 10, 12, etc.,) until you're back at index 96. Always try and use the same pressure. This will help prevent over-cutting (pushing past the stop).
When you finish, you should have 48 tiny parallel facets, as shown below. This now called the girdle. (Please note, these are not the girdle facets defined in the "Standard Brilliant Cut Terminology" section. Parts 4 and 5 will cover those facets in the pavilion and crown sections).
Don't forget to turn off your water when you finish.
You've now formed your gemstone's girdle. It was hard, but you got there. Raise your quill away from the machine, remove the coarse lap, and place it in its holder.
At this point, check for inclusions and flaws you could have missed when viewing the rough. Paint a little Refractol on the surface and do another check. If you see some inclusions or flaws, try and hide them under the girdle facets. Alternatively, they might cut out when you do the pavilion. You must decide now whether you should go on or not.
Clean everything, including the gemstone still in the quill. Cleanliness is most important during these lap changes. Make sure to clean wherever your hand rested against the swarf tray. Any contamination going forward can ruin all your work as well as the laps.
Next, we put on the pre-polish lap. (Review how to prepare this lap). Don't use water yet on this newly prepared lap.
As before, lower the quill until it just touches the lap. Then, lift the quill from the lap and start the machine. This time, use only slow to moderate speed. (You don't want to throw off all your diamond powder).
Whether you're doing the girdle the "round" way or the faceted way, use very light pressure until you gain more experience.
If you're rounding the girdle, set the index wheel to "free wheel." It should be turned against the rotation (counterclockwise).
If you're faceting the girdle (see the "Cutting the Girdle" section, above), start on index 96, then go to 2, and progressively cut every 2 indices until you complete all facets.
Remember, at this stage, we're just trying to remove the scratches from the last lap. Since newly prepared laps cut fast, you don't need to remove much material. When the facets look satiny all over, they're done.
If the lap seems too dry, add a couple of drops of cleaner or polish extender onto it. Spread it with a finger. This may get a bit messy with the oil, but that's why you have the tissues handy.
Always clean the stone every time you need to look at it.
Check to make sure you have the girdle as round as you can get it. Once that's done, lift the quill and put away your pre-polish lap.
You may have noticed you didn't need to use water at this time. This is because you're using the gem to push diamond powder into the copper lap, just like when you rolled the coarse lap. Later though, this won't be the case. Since the diamond is already pushed in, the oil becomes fouled and forms a barrier. This makes the lap more difficult to use. In this case, wash the lap with hot, soapy water to remove all the swarf. From that stage forward, you'll use water as a lubricant.
By using the lap in this manner, you'll get the most benefit from the pre-polish powder. With a measly amount of diamond powder, you'll be able to do 3, 4, or more gemstones.
The next step for the standard brilliant cut is the pavilion.


