

Learn the basic procedures of gemstone faceting. This walkthrough for a standard round brilliant cut gem includes cutting instructions and pics.
16 Minute Read
To unravel the mysteries of gemstone faceting, I'll describe the cutting process as if you're actually doing it. The rough isn't important. The procedures are the same for amethyst, emerald, or any other gem material. There are several steps, but none of them are particularly complicated. Once you see how simple it is, you'll understand that it's something you can do.
There are three basic elements to arranging the facets on a gemstone:
These three settings precisely locate every facet on a gem. Although making adjustments varies slightly from one faceting machine to another, all machines work on the same principles.
When cutting a gem, the design instructions tell you the index and angle for each facet. There is no guessing. The depth of the cut will be obvious when cutting. If your facets don't come together, you need to cut them deeper. If you cut them too deep … well, all beginners need to learn to use a light hand. Correcting over-cut facets requires recutting the previous stages to the new depth. Hence the saying, "cut a little, look a lot."
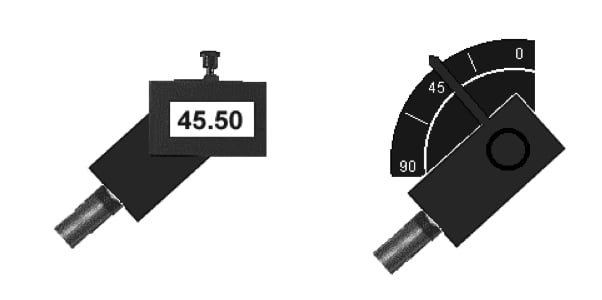
The angle of your cut is set on a protractor or read off a digital display. Setting the angle varies slightly between gemstone faceting machines. On some machines, you loosen a set screw, adjust the angle, and re-tighten the screw. On other machines, you turn a handle until you reach the proper angle.
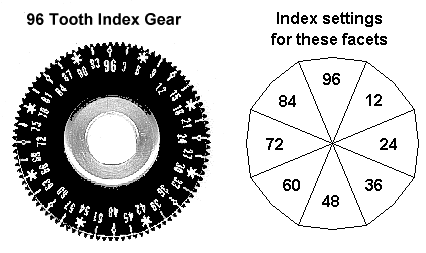
The index gear controls the rotation of the gem. They're available in a variety of sizes, but 64 and 96 are the most common. To set the index, you release a pin, rotate the gear to the properly numbered slot, and let the pin return to its holding position.
Called a "height setting," this determines how deep each facet is cut. A coarse adjustment brings your setting in close. A fine control makes the final setting.
Occasionally, you'll have a facet that won't lay flat on the polishing lap. A "cheater" control lets you make subtle, side-to-side adjustments. These are less than a full index number.
Water, often with additives, is used as a lubricant. Every gemstone faceting machine has a method of wetting the cutting laps. The most common is a beautifully simple drip tank. You just open the valve to where you get a few drips per second. You want just enough to keep everything damp without excessive splashing.
Every gemstone faceting machine has a method for controlling the speed of the laps. Many also allow you to reverse the direction of rotation. As a rule, use higher speeds when coarse cutting, slower speeds when polishing.
Laps are disks with abrasives on the surface. They're usually metal charged with diamond, but other materials and abrasives are also used. They go on a revolving platform and are changed as needed. Cutting and polishing are done in stages. You start by removing the excess material with a coarse lap. Next, the scratches are sanded out with a finer lap. Finally, a polishing lap is used for finishing.
Now that you're familiar with the controls, you're ready to go through the procedures for a standard, round brilliant cut.
First, inspect the gem to make there are no fractures that will cause problems. Then, attach the gem to a dop stick and insert it in the faceting machine. (See "The Minimum Cutting Technique" and "Dopping Techniques" for more information).
The dop is free to swing side-to-side during cutting and can be lifted for inspection. The angle setting is what limits the downward swing. This is important to understand, because an under or over-cut facet won't be at the proper angle. This is called a "hard stop" and is found on almost all gemstone faceting machines. The Facetron has no stop. You'll need to modify your technique to use this machine.
Place a coarse cutting lap on your machine. Set the speed to medium and turn on the water. Get the lap thoroughly wet, spreading the water with your fingers if necessary, then turn everything off.
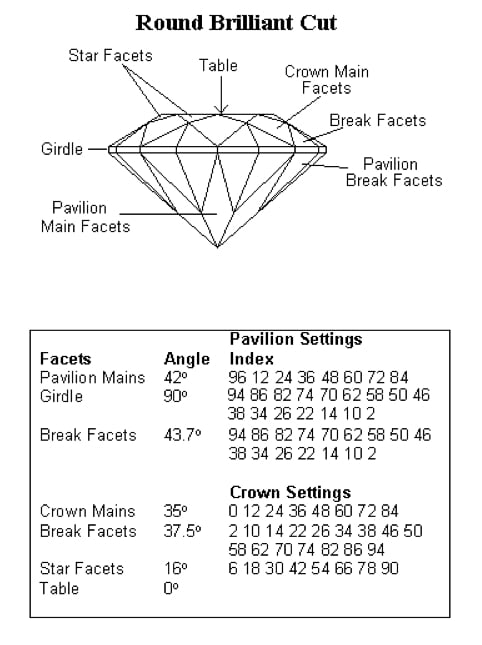
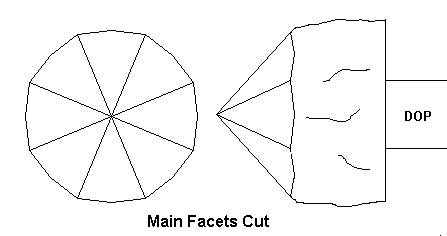
Look at the instructions above for cutting a round brilliant gem. You have eight pavilion main facets to cut at 42º. Set the angle on your machine to 42. They're cut at index settings 96, 12, 24, 36, 48, 60, 72, and 84. Set the index on your machine to 96 for the first facet.
Adjust the height so the stone will just meet the lap. This won't be deep enough but it's the proper place to begin.
Now, turn on the water and machine again. Gently introduce the stone to the lap and sweep it back and forth across the surface. Don't use much force. Apply just enough pressure to keep the stone in contact with the cutting surface. When you've cut all the way to your depth setting, the sound will change. It will go from a grinding noise to a "shhh" sound. If the pressure you're using is light enough, it'll be a clicking sound, as just the largest abrasive particles touch the gem. This technique is called "cutting by sound." It's a valuable skill to develop, so pay attention to it right from the beginning.
When your first facet is cut, turn the gem over to the opposite index setting, 48. Repeat the cutting procedure until the facet is fully cut to the selected depth.
Now look at your stone. Do the two facets you've cut come together in the center? If they do, you set your machine too deep. Bear this in mind for the next stone you try. You don't want to remove too much material in the initial stages.
You want to see two flat surfaces on an otherwise rough shaped piece of material that don't come together. Lower the head a bit and cut both facets again. Repeat this process of lowering the head and recutting the facets until they meet in the center. You'll get quicker with practice, but you need to start on the conservative side so you learn not to waste material.
Once you have your depth set properly, cut the rest of the pavilion main facets at index settings 12, 24, 36, 60, 72, and 84. If you find that one of these facets doesn't reach the center, or has an uncut shallow area in it, lower the stone again. Recut all the main facets at this new depth setting.
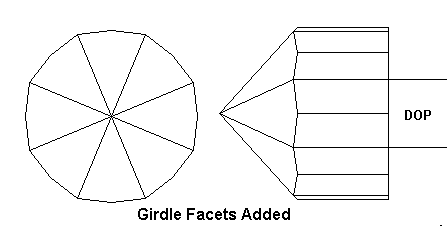
The next step is cutting the girdle. Adjust the angle setting to 90º. This puts the gem parallel to the lap. Your gemstone faceting machine will have an opening in the splashguard or a means to hold it out of the way while cutting the girdle. Do this now. Set the index to your first setting, which is 2. Now, carefully lower the gem until it just touches the lap.
Turn on the machine and water. Cut the first three facets at indexes 2, 10, and 14. They're small and won't need nearly as much cutting as the main facets. When finished, inspect your gem to see if these facets come together. If they don't, then you'll have to lower the head. When the depth is set, continue cutting at the other index settings. You'll probably come to an area that is shallower than the rest of the stone. Lower the gem until you can cut the girdle facets at this section. You've now found the minimum distance you need to cut. Go back and cut all the girdle facets to this depth.
You've now shaped the pavilion of the gem. However, the coarse lap has left a very rough surface. You can't see them, but there are tiny, subsurface fractures as well. You need to smooth the surface before you can polish the gem.
Remove the coarse lap from the machine. Clean the gem and all the controls with a damp cloth. This will remove any coarse particles that could contaminate your pre-polish lap. You don't want to learn this lesson the hard way! Contamination is a very serious problem but can be avoided easily.
Place the pre-polish lap on your machine and wet it. You ended your last sequence by cutting the girdle. Since your machine is already set at 90, it makes sense to pre-polish the girdle first. Set the index to 2.
Setting the height accurately is very important, since you're only removing a tiny amount of material in this step. Begin by setting the height so the stone just barely touches the lap. Many gemstone faceting machines won't have the lap perfectly level to the swing of the dop. If this is the case, adjust your height so the gem first touches the lap in line with the center. For accuracy, always stop cutting at this line.
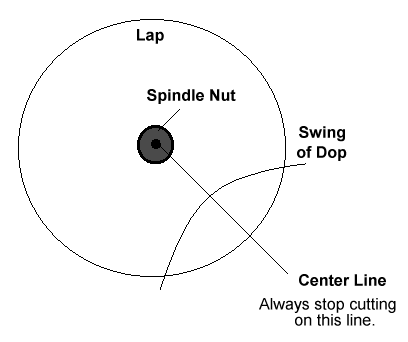
Using the fine adjustment, lower the gem just one tiny increment. Pre-polish the first facet, carefully stopping on your centerline. Now, inspect the facet. It should have a smooth, frosted surface with no visible pitting. If not, lower the gem just a tiny bit more and cut it again. Once you have the depth set correctly, pre-polish the remainder of the girdle facets. Listen carefully and you can hear when the cutting stops.
The next step is pre-polishing the main facets. Set your angle to 42º and the index to 96. Adjust the height so the gem barely touches the lap on the centerline. Lower it one more tiny increment. Now, pre-polish the mains just as you did the girdle facets.
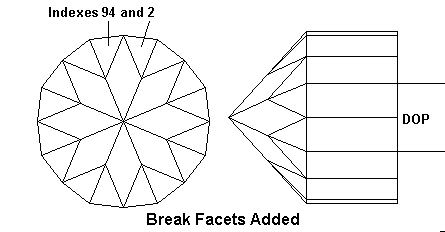
Next are the break facets. These are so small they're cut in the pre-polish stage, not the coarse stage. Your main facets are cut at 42º. The break facets are cut at 43.7º. That's just a tiny sliver!
To cut the break facets, set the angle to 43.7 and the index to 2. Adjust the height so the gem barely touches the pre-polishing lap. Very gently, cut two facets at index 2 and 10. The technique is to introduce the gem to the lap with a very light hand and bring it towards the centerline. It should only take a couple of swings of the dop to cut the facets.
When fully cut, they'll create a level girdle and come together in the center. However, they shouldn't come together yet. Lower the head just a bit and cut them again. Repeat this process until the facets come together properly. When the height is set correctly, cut the remainder of the facets.
Inspect your progress frequently. One of the most difficult aspects of faceting is learning hand control. Even though your machine is properly set, you can under or over cut small facets. Pay attention to your hand pressure. Learning to use consistent pressure is the key to getting uniform facets.
Before polishing, remove the pre-polish lap. To avoid contamination, thoroughly clean your hands, the gem (especially the area where it attaches to the dop), and the machine.
Put your polishing lap on the machine. The techniques for preparing the laps vary with the materials used. However, once set up, the process remains essentially the same. (See "Polishing Laps and Techniques" for more information).
You've just finished the break facets. Since your angle is already set for them, polishing them first makes sense. Set your index to 2. Adjust the height so your facet just barely touches the lap on the centerline. Turn on the water and set the speed to slow.
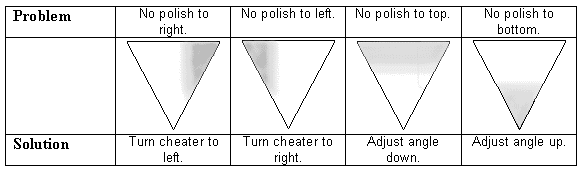
Introduce your facet to the lap very gently. Polish it for about three seconds. Now, pick up the stone and inspect your polish. It may be incomplete, which simply requires a few more seconds on the lap. However, you may find that the polish is not completely covering the facet. In that case, you'll have to make some subtle adjustments to get a perfect alignment. The cheater control adjusts the side-to-side alignment. The angle controls the facet's up-and-down alignment.
There's a simple rule to making these adjustments. When you lift a stone for inspection, make your adjustment in the opposite direction to where it needs polishing. To test your alignment, paint the facet with a felt tip marker. Give it a second to dry, then rub the facet on your polishing lap. If the ink is removed across the entire facet, your adjustment is correct. If not, make the necessary correction.
When your facet is properly aligned, repeat the polishing process. Check your progress every three to five seconds. You might over-cut small facets in the polishing stage, so be conservative. Don't hurry. Repeat this process on the other break facets.
After your break facets are polished, move on to the pavilion mains. The procedures remain the same, but these facets take a little longer to polish. Make your inspections every five to ten seconds.
To polish the girdle facets, set your machine to 92° or 93º. This purposely sets the machine so only the edge polishes. There's no need to polish the entire surface, as most of it will be cut away in the next step. When polishing, inspect the girdle facets every couple of seconds. They're tiny and polish rapidly.
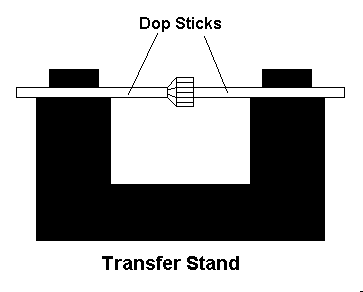
The procedures for cutting the crown are nearly identical to cutting the pavilion. However, there are two additional steps. Before cutting the crown, the gem needs to be turned over to be dopped on the other side. Every gemstone faceting machine comes with a transfer fixture, so this can be done accurately. (See "Dopping Techniques" and your machine instructions for details).
Place the new dop in the machine. If you don't have a keyed dop system, set the index to 2 and leave the angle at 90º. Lower the head until you can lay a girdle facet flat on the polishing lap. Now tighten the dop.
Set the index to 96 and look at your stone. If the peaks of the main facets are aligned straight up and down, it's properly oriented. If they're slightly cantered, set the index to 2 and place the stone on the lap again. Loosen the dop and rotate the stone to one of the adjoining facets. Tighten the dop again. There are only two ways of orienting the stone, so it has to be correct after this adjustment.
Place the coarse lap on the machine and set the angle to 35º. Set the index to 96 and adjust the height so the stone barely touches the lap. This facet determines the thickness of the girdle. When the gem is finished, the girdle should be about 3% to 4% of the diameter of the gem. For example, if your stone measures 6 mm in diameter, the girdle should be between 0.18 mm and 0.24 mm, or roughly 1/5 mm. After cutting this facet, you have to pre-polish and then polish it. Both of these steps will remove more material. For this stage, you want to stop cutting at about twice the size of your finished facet, or about 2/5 mm.
Cut this facet and then lower the height. Keep adjusting the depth setting until you reach the proper depth. Then, cut the remainder of the crown main facets.
Clean the gem and the machine and put the pre-polishing lap on the spindle. The angle is already set for the mains, so simply set the index to 96 and adjust the height so the gem barely touches the lap. Pre-polish the first facet and inspect it to make sure you've removed all the coarse scratches.
Now, look at your girdle thickness. It's changed from the first cutting and will change very little when polished. Is it pretty close to the thickness you want? If not, you can cut it a little deeper. If you're uncertain, just stop. It's better to have a girdle that is a bit too thick than too thin. Thin girdles are prone to break when a metalsmith tightens the prongs against them.
When the mains are pre-polished, set the angle to 37.5º and the index to 94. Lower the head until the stone barely touches the lap. Cut the first two crown break facets at indexes 94 and 2. Lower the head as needed until the crown break facets create a level girdle and come together in the center. Then, cut the remainder of the sequence, checking your progress regularly.
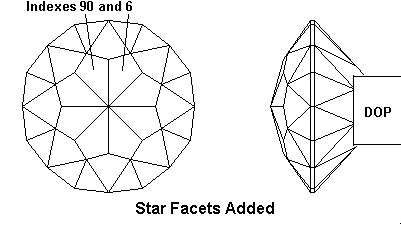
With the pre-polish lap still in place, set the angle to 16º and then adjust your height setting until the stone barely touches the lap. Cut the first two star facets at indexes 90 and 6. Adjust your height setting until they almost touch the top of the crown break facets. (They will enlarge slightly when polished, so leave a wee bit of room.) Then, cut the remainder of the star facets to that depth.
Next, clean the machine thoroughly and place a polishing lap on the spindle. The angle is set for the star facets, so polish them first. Polish the crown main facets next and finish with your crown break facets. You may find your points don't come together as precisely as the diagrams. You can make fine adjustments with the polishing lap but don't worry about it. This is your first faceted gem. Your priorities are learning the sequence. With experience, your technique will improve.
The final step is to cut the table. You'll need to use the table adapter that came with your gemstone faceting machine. Set the angle to 45º and place the table adapter where the dop usually goes. The dop goes in the table adapter, which holds the gem perpendicular to the lap.
Put a coarse to medium cutting lap in the machine, depending on how much material you need to remove. Set the height to make a small cut. Gradually lower the height setting, cutting a progressively larger table. As the table grows, you may find it isn't level, that it isn't approaching the top of the main facets equally. The procedure for aligning the table is much like aligning for polishing. If you need to cut more towards the top, lower the angle a bit. If you need to go to the right, turn the cheater control to the left, etc. Remember, always adjust to the opposite side. The more accurate your gemstone faceting machine, the less likely you'll have to make any adjustments.
Cut the table until it nearly touches the juncture of the break and main facets. Switch to the pre-polish lap and bring it in just as close as you can. Finish by polishing the table.
Now, do you think you can do this? Of course you can! There are several steps to put 57 facets on a gem, but none of them are difficult. Cutting your first round brilliant is really the hardest step, since you have to learn all the new controls and procedures. At first, you'll need six to eight hours. With practice, you'll only need an hour or two.
Once you're familiar with your gemstone faceting machine, you can move on to other shapes. Soon, you'll be faceting like a professional. In fact, your gems will be better cut than the majority of stones you see in jewelry stores. Those are cut with methods that prioritize speed over accuracy. You can do better work than most full-time lapidaries! Your gems will have more value because of precision cutting, and you can take pride in work well done.


When you join the IGS community, you get trusted diamond & gemstone information when you need it.
To unravel the mysteries of gemstone faceting, I'll describe the cutting process as if you're actually doing it. The rough isn't important. The procedures are the same for amethyst, emerald, or any other gem material. There are several steps, but none of them are particularly complicated. Once you see how simple it is, you'll understand that it's something you can do.
There are three basic elements to arranging the facets on a gemstone:
These three settings precisely locate every facet on a gem. Although making adjustments varies slightly from one faceting machine to another, all machines work on the same principles.
When cutting a gem, the design instructions tell you the index and angle for each facet. There is no guessing. The depth of the cut will be obvious when cutting. If your facets don't come together, you need to cut them deeper. If you cut them too deep … well, all beginners need to learn to use a light hand. Correcting over-cut facets requires recutting the previous stages to the new depth. Hence the saying, "cut a little, look a lot."
The angle of your cut is set on a protractor or read off a digital display. Setting the angle varies slightly between gemstone faceting machines. On some machines, you loosen a set screw, adjust the angle, and re-tighten the screw. On other machines, you turn a handle until you reach the proper angle.
The index gear controls the rotation of the gem. They're available in a variety of sizes, but 64 and 96 are the most common. To set the index, you release a pin, rotate the gear to the properly numbered slot, and let the pin return to its holding position.
Called a "height setting," this determines how deep each facet is cut. A coarse adjustment brings your setting in close. A fine control makes the final setting.
Occasionally, you'll have a facet that won't lay flat on the polishing lap. A "cheater" control lets you make subtle, side-to-side adjustments. These are less than a full index number.
Water, often with additives, is used as a lubricant. Every gemstone faceting machine has a method of wetting the cutting laps. The most common is a beautifully simple drip tank. You just open the valve to where you get a few drips per second. You want just enough to keep everything damp without excessive splashing.
Every gemstone faceting machine has a method for controlling the speed of the laps. Many also allow you to reverse the direction of rotation. As a rule, use higher speeds when coarse cutting, slower speeds when polishing.
Laps are disks with abrasives on the surface. They're usually metal charged with diamond, but other materials and abrasives are also used. They go on a revolving platform and are changed as needed. Cutting and polishing are done in stages. You start by removing the excess material with a coarse lap. Next, the scratches are sanded out with a finer lap. Finally, a polishing lap is used for finishing.
Now that you're familiar with the controls, you're ready to go through the procedures for a standard, round brilliant cut.
First, inspect the gem to make there are no fractures that will cause problems. Then, attach the gem to a dop stick and insert it in the faceting machine. (See "The Minimum Cutting Technique" and "Dopping Techniques" for more information).
The dop is free to swing side-to-side during cutting and can be lifted for inspection. The angle setting is what limits the downward swing. This is important to understand, because an under or over-cut facet won't be at the proper angle. This is called a "hard stop" and is found on almost all gemstone faceting machines. The Facetron has no stop. You'll need to modify your technique to use this machine.
Place a coarse cutting lap on your machine. Set the speed to medium and turn on the water. Get the lap thoroughly wet, spreading the water with your fingers if necessary, then turn everything off.
Look at the instructions above for cutting a round brilliant gem. You have eight pavilion main facets to cut at 42º. Set the angle on your machine to 42. They're cut at index settings 96, 12, 24, 36, 48, 60, 72, and 84. Set the index on your machine to 96 for the first facet.
Adjust the height so the stone will just meet the lap. This won't be deep enough but it's the proper place to begin.
Now, turn on the water and machine again. Gently introduce the stone to the lap and sweep it back and forth across the surface. Don't use much force. Apply just enough pressure to keep the stone in contact with the cutting surface. When you've cut all the way to your depth setting, the sound will change. It will go from a grinding noise to a "shhh" sound. If the pressure you're using is light enough, it'll be a clicking sound, as just the largest abrasive particles touch the gem. This technique is called "cutting by sound." It's a valuable skill to develop, so pay attention to it right from the beginning.
When your first facet is cut, turn the gem over to the opposite index setting, 48. Repeat the cutting procedure until the facet is fully cut to the selected depth.
Now look at your stone. Do the two facets you've cut come together in the center? If they do, you set your machine too deep. Bear this in mind for the next stone you try. You don't want to remove too much material in the initial stages.
You want to see two flat surfaces on an otherwise rough shaped piece of material that don't come together. Lower the head a bit and cut both facets again. Repeat this process of lowering the head and recutting the facets until they meet in the center. You'll get quicker with practice, but you need to start on the conservative side so you learn not to waste material.
Once you have your depth set properly, cut the rest of the pavilion main facets at index settings 12, 24, 36, 60, 72, and 84. If you find that one of these facets doesn't reach the center, or has an uncut shallow area in it, lower the stone again. Recut all the main facets at this new depth setting.
The next step is cutting the girdle. Adjust the angle setting to 90º. This puts the gem parallel to the lap. Your gemstone faceting machine will have an opening in the splashguard or a means to hold it out of the way while cutting the girdle. Do this now. Set the index to your first setting, which is 2. Now, carefully lower the gem until it just touches the lap.
Turn on the machine and water. Cut the first three facets at indexes 2, 10, and 14. They're small and won't need nearly as much cutting as the main facets. When finished, inspect your gem to see if these facets come together. If they don't, then you'll have to lower the head. When the depth is set, continue cutting at the other index settings. You'll probably come to an area that is shallower than the rest of the stone. Lower the gem until you can cut the girdle facets at this section. You've now found the minimum distance you need to cut. Go back and cut all the girdle facets to this depth.
You've now shaped the pavilion of the gem. However, the coarse lap has left a very rough surface. You can't see them, but there are tiny, subsurface fractures as well. You need to smooth the surface before you can polish the gem.
Remove the coarse lap from the machine. Clean the gem and all the controls with a damp cloth. This will remove any coarse particles that could contaminate your pre-polish lap. You don't want to learn this lesson the hard way! Contamination is a very serious problem but can be avoided easily.
Place the pre-polish lap on your machine and wet it. You ended your last sequence by cutting the girdle. Since your machine is already set at 90, it makes sense to pre-polish the girdle first. Set the index to 2.
Setting the height accurately is very important, since you're only removing a tiny amount of material in this step. Begin by setting the height so the stone just barely touches the lap. Many gemstone faceting machines won't have the lap perfectly level to the swing of the dop. If this is the case, adjust your height so the gem first touches the lap in line with the center. For accuracy, always stop cutting at this line.
Using the fine adjustment, lower the gem just one tiny increment. Pre-polish the first facet, carefully stopping on your centerline. Now, inspect the facet. It should have a smooth, frosted surface with no visible pitting. If not, lower the gem just a tiny bit more and cut it again. Once you have the depth set correctly, pre-polish the remainder of the girdle facets. Listen carefully and you can hear when the cutting stops.
The next step is pre-polishing the main facets. Set your angle to 42º and the index to 96. Adjust the height so the gem barely touches the lap on the centerline. Lower it one more tiny increment. Now, pre-polish the mains just as you did the girdle facets.
Next are the break facets. These are so small they're cut in the pre-polish stage, not the coarse stage. Your main facets are cut at 42º. The break facets are cut at 43.7º. That's just a tiny sliver!
To cut the break facets, set the angle to 43.7 and the index to 2. Adjust the height so the gem barely touches the pre-polishing lap. Very gently, cut two facets at index 2 and 10. The technique is to introduce the gem to the lap with a very light hand and bring it towards the centerline. It should only take a couple of swings of the dop to cut the facets.
When fully cut, they'll create a level girdle and come together in the center. However, they shouldn't come together yet. Lower the head just a bit and cut them again. Repeat this process until the facets come together properly. When the height is set correctly, cut the remainder of the facets.
Inspect your progress frequently. One of the most difficult aspects of faceting is learning hand control. Even though your machine is properly set, you can under or over cut small facets. Pay attention to your hand pressure. Learning to use consistent pressure is the key to getting uniform facets.
Before polishing, remove the pre-polish lap. To avoid contamination, thoroughly clean your hands, the gem (especially the area where it attaches to the dop), and the machine.
Put your polishing lap on the machine. The techniques for preparing the laps vary with the materials used. However, once set up, the process remains essentially the same. (See "Polishing Laps and Techniques" for more information).
You've just finished the break facets. Since your angle is already set for them, polishing them first makes sense. Set your index to 2. Adjust the height so your facet just barely touches the lap on the centerline. Turn on the water and set the speed to slow.
Introduce your facet to the lap very gently. Polish it for about three seconds. Now, pick up the stone and inspect your polish. It may be incomplete, which simply requires a few more seconds on the lap. However, you may find that the polish is not completely covering the facet. In that case, you'll have to make some subtle adjustments to get a perfect alignment. The cheater control adjusts the side-to-side alignment. The angle controls the facet's up-and-down alignment.
There's a simple rule to making these adjustments. When you lift a stone for inspection, make your adjustment in the opposite direction to where it needs polishing. To test your alignment, paint the facet with a felt tip marker. Give it a second to dry, then rub the facet on your polishing lap. If the ink is removed across the entire facet, your adjustment is correct. If not, make the necessary correction.
When your facet is properly aligned, repeat the polishing process. Check your progress every three to five seconds. You might over-cut small facets in the polishing stage, so be conservative. Don't hurry. Repeat this process on the other break facets.
After your break facets are polished, move on to the pavilion mains. The procedures remain the same, but these facets take a little longer to polish. Make your inspections every five to ten seconds.
To polish the girdle facets, set your machine to 92° or 93º. This purposely sets the machine so only the edge polishes. There's no need to polish the entire surface, as most of it will be cut away in the next step. When polishing, inspect the girdle facets every couple of seconds. They're tiny and polish rapidly.
The procedures for cutting the crown are nearly identical to cutting the pavilion. However, there are two additional steps. Before cutting the crown, the gem needs to be turned over to be dopped on the other side. Every gemstone faceting machine comes with a transfer fixture, so this can be done accurately. (See "Dopping Techniques" and your machine instructions for details).
Place the new dop in the machine. If you don't have a keyed dop system, set the index to 2 and leave the angle at 90º. Lower the head until you can lay a girdle facet flat on the polishing lap. Now tighten the dop.
Set the index to 96 and look at your stone. If the peaks of the main facets are aligned straight up and down, it's properly oriented. If they're slightly cantered, set the index to 2 and place the stone on the lap again. Loosen the dop and rotate the stone to one of the adjoining facets. Tighten the dop again. There are only two ways of orienting the stone, so it has to be correct after this adjustment.
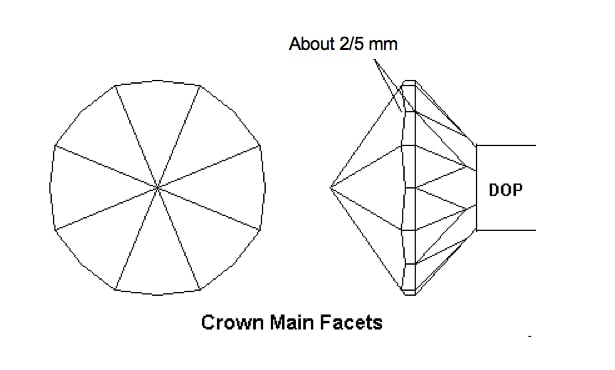
Place the coarse lap on the machine and set the angle to 35º. Set the index to 96 and adjust the height so the stone barely touches the lap. This facet determines the thickness of the girdle. When the gem is finished, the girdle should be about 3% to 4% of the diameter of the gem. For example, if your stone measures 6 mm in diameter, the girdle should be between 0.18 mm and 0.24 mm, or roughly 1/5 mm. After cutting this facet, you have to pre-polish and then polish it. Both of these steps will remove more material. For this stage, you want to stop cutting at about twice the size of your finished facet, or about 2/5 mm.
Cut this facet and then lower the height. Keep adjusting the depth setting until you reach the proper depth. Then, cut the remainder of the crown main facets.
Clean the gem and the machine and put the pre-polishing lap on the spindle. The angle is already set for the mains, so simply set the index to 96 and adjust the height so the gem barely touches the lap. Pre-polish the first facet and inspect it to make sure you've removed all the coarse scratches.
Now, look at your girdle thickness. It's changed from the first cutting and will change very little when polished. Is it pretty close to the thickness you want? If not, you can cut it a little deeper. If you're uncertain, just stop. It's better to have a girdle that is a bit too thick than too thin. Thin girdles are prone to break when a metalsmith tightens the prongs against them.
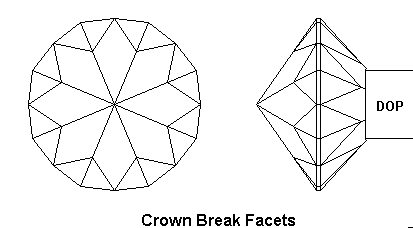
When the mains are pre-polished, set the angle to 37.5º and the index to 94. Lower the head until the stone barely touches the lap. Cut the first two crown break facets at indexes 94 and 2. Lower the head as needed until the crown break facets create a level girdle and come together in the center. Then, cut the remainder of the sequence, checking your progress regularly.
With the pre-polish lap still in place, set the angle to 16º and then adjust your height setting until the stone barely touches the lap. Cut the first two star facets at indexes 90 and 6. Adjust your height setting until they almost touch the top of the crown break facets. (They will enlarge slightly when polished, so leave a wee bit of room.) Then, cut the remainder of the star facets to that depth.
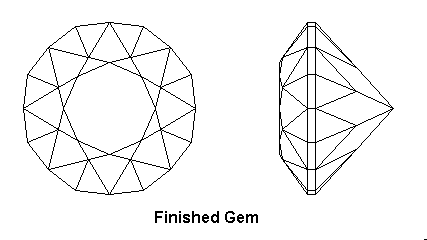
Next, clean the machine thoroughly and place a polishing lap on the spindle. The angle is set for the star facets, so polish them first. Polish the crown main facets next and finish with your crown break facets. You may find your points don't come together as precisely as the diagrams. You can make fine adjustments with the polishing lap but don't worry about it. This is your first faceted gem. Your priorities are learning the sequence. With experience, your technique will improve.
The final step is to cut the table. You'll need to use the table adapter that came with your gemstone faceting machine. Set the angle to 45º and place the table adapter where the dop usually goes. The dop goes in the table adapter, which holds the gem perpendicular to the lap.
Put a coarse to medium cutting lap in the machine, depending on how much material you need to remove. Set the height to make a small cut. Gradually lower the height setting, cutting a progressively larger table. As the table grows, you may find it isn't level, that it isn't approaching the top of the main facets equally. The procedure for aligning the table is much like aligning for polishing. If you need to cut more towards the top, lower the angle a bit. If you need to go to the right, turn the cheater control to the left, etc. Remember, always adjust to the opposite side. The more accurate your gemstone faceting machine, the less likely you'll have to make any adjustments.
Cut the table until it nearly touches the juncture of the break and main facets. Switch to the pre-polish lap and bring it in just as close as you can. Finish by polishing the table.
Now, do you think you can do this? Of course you can! There are several steps to put 57 facets on a gem, but none of them are difficult. Cutting your first round brilliant is really the hardest step, since you have to learn all the new controls and procedures. At first, you'll need six to eight hours. With practice, you'll only need an hour or two.
Once you're familiar with your gemstone faceting machine, you can move on to other shapes. Soon, you'll be faceting like a professional. In fact, your gems will be better cut than the majority of stones you see in jewelry stores. Those are cut with methods that prioritize speed over accuracy. You can do better work than most full-time lapidaries! Your gems will have more value because of precision cutting, and you can take pride in work well done.


